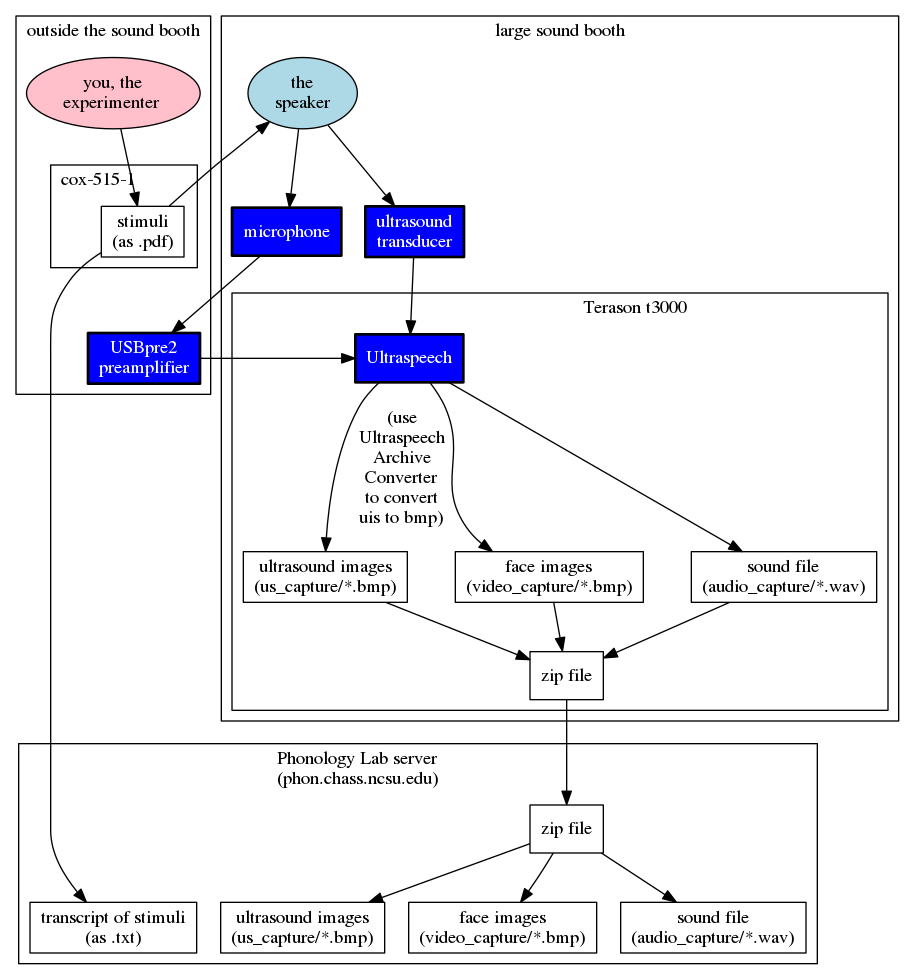
This page includes information on using Terason T3000 and Ultraspeech, the set up of hardware and software for ultrasound (as well as video and audio) recording, saving and uploading data to the server.
Using the Ultrasound Equipment
THE Ultrasound Machine
The Terason T3000 ultrasound machine is built out of a MacBook Pro, and it runs the “Terason Ultrasound” Windows application to do imaging. Like other machines used in phonetics laboratories, the T3000 is intended for diagnostic ultrasound imaging, not laboratory phonology, so we have to adapt it to our needs.
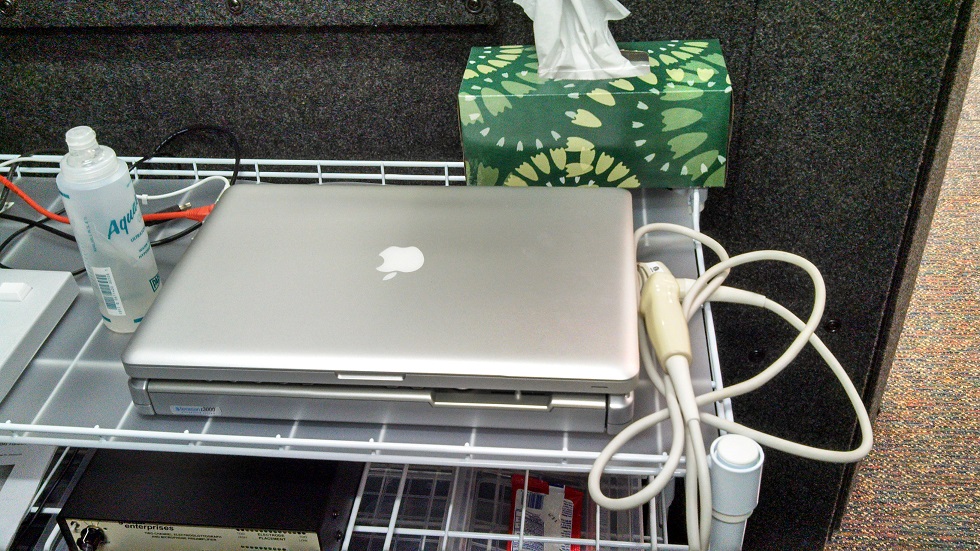
The T3000 needs to be connected to its (large) power supply, and it needs to have the transducer (or probe) plugged into its socket on the right side of the machine. A tray with lots of buttons on it pops out of the ultrasound part of the machine when you push the two round buttons on either side of it. All of the functions accessed from the pop-out tray are also available using the mouse and keyboard in the program. You will need ultrasound gel and sanitary wipes. You can use facial tissues to wipe off the gel but always use a sanitary wipe to sanitize the probe in between users. Disposable paper cups are kept in the bins below the T3000 and can be used to provide participants with water to swallow so their palates can be imaged. Tongue depressors are also kept in the same bin which are used to locate participants’ occlusal planes (i.e., the plane of contact between the maxillary and mandibular teeth).
The ultrasound machine is set up in booth number one (the largest of the three booths) such that a monitor is visible from inside the booth. This can be used to display stimuli to participants during recording sessions. You can find the clicker attached to the wall of the booth with velcro. All items should be returned to their bins when not in use and the T3000 must be fully shut off as it tends to overheat.
Generating Ultrasound Images
IMAGING WITH THE PROBE: How to get the desired ultrasound image
The imaging options available to you in the Terason Ultrasound software include the depth of imaging. You want to image at as shallow a depth as you can without the tongue ever disappearing off the top of the fan (Figure 1). 8cm is often a reasonable depth to use, but some subjects will image better with different settings. You can experiment with the effect that other settings have on the appearance of the image.
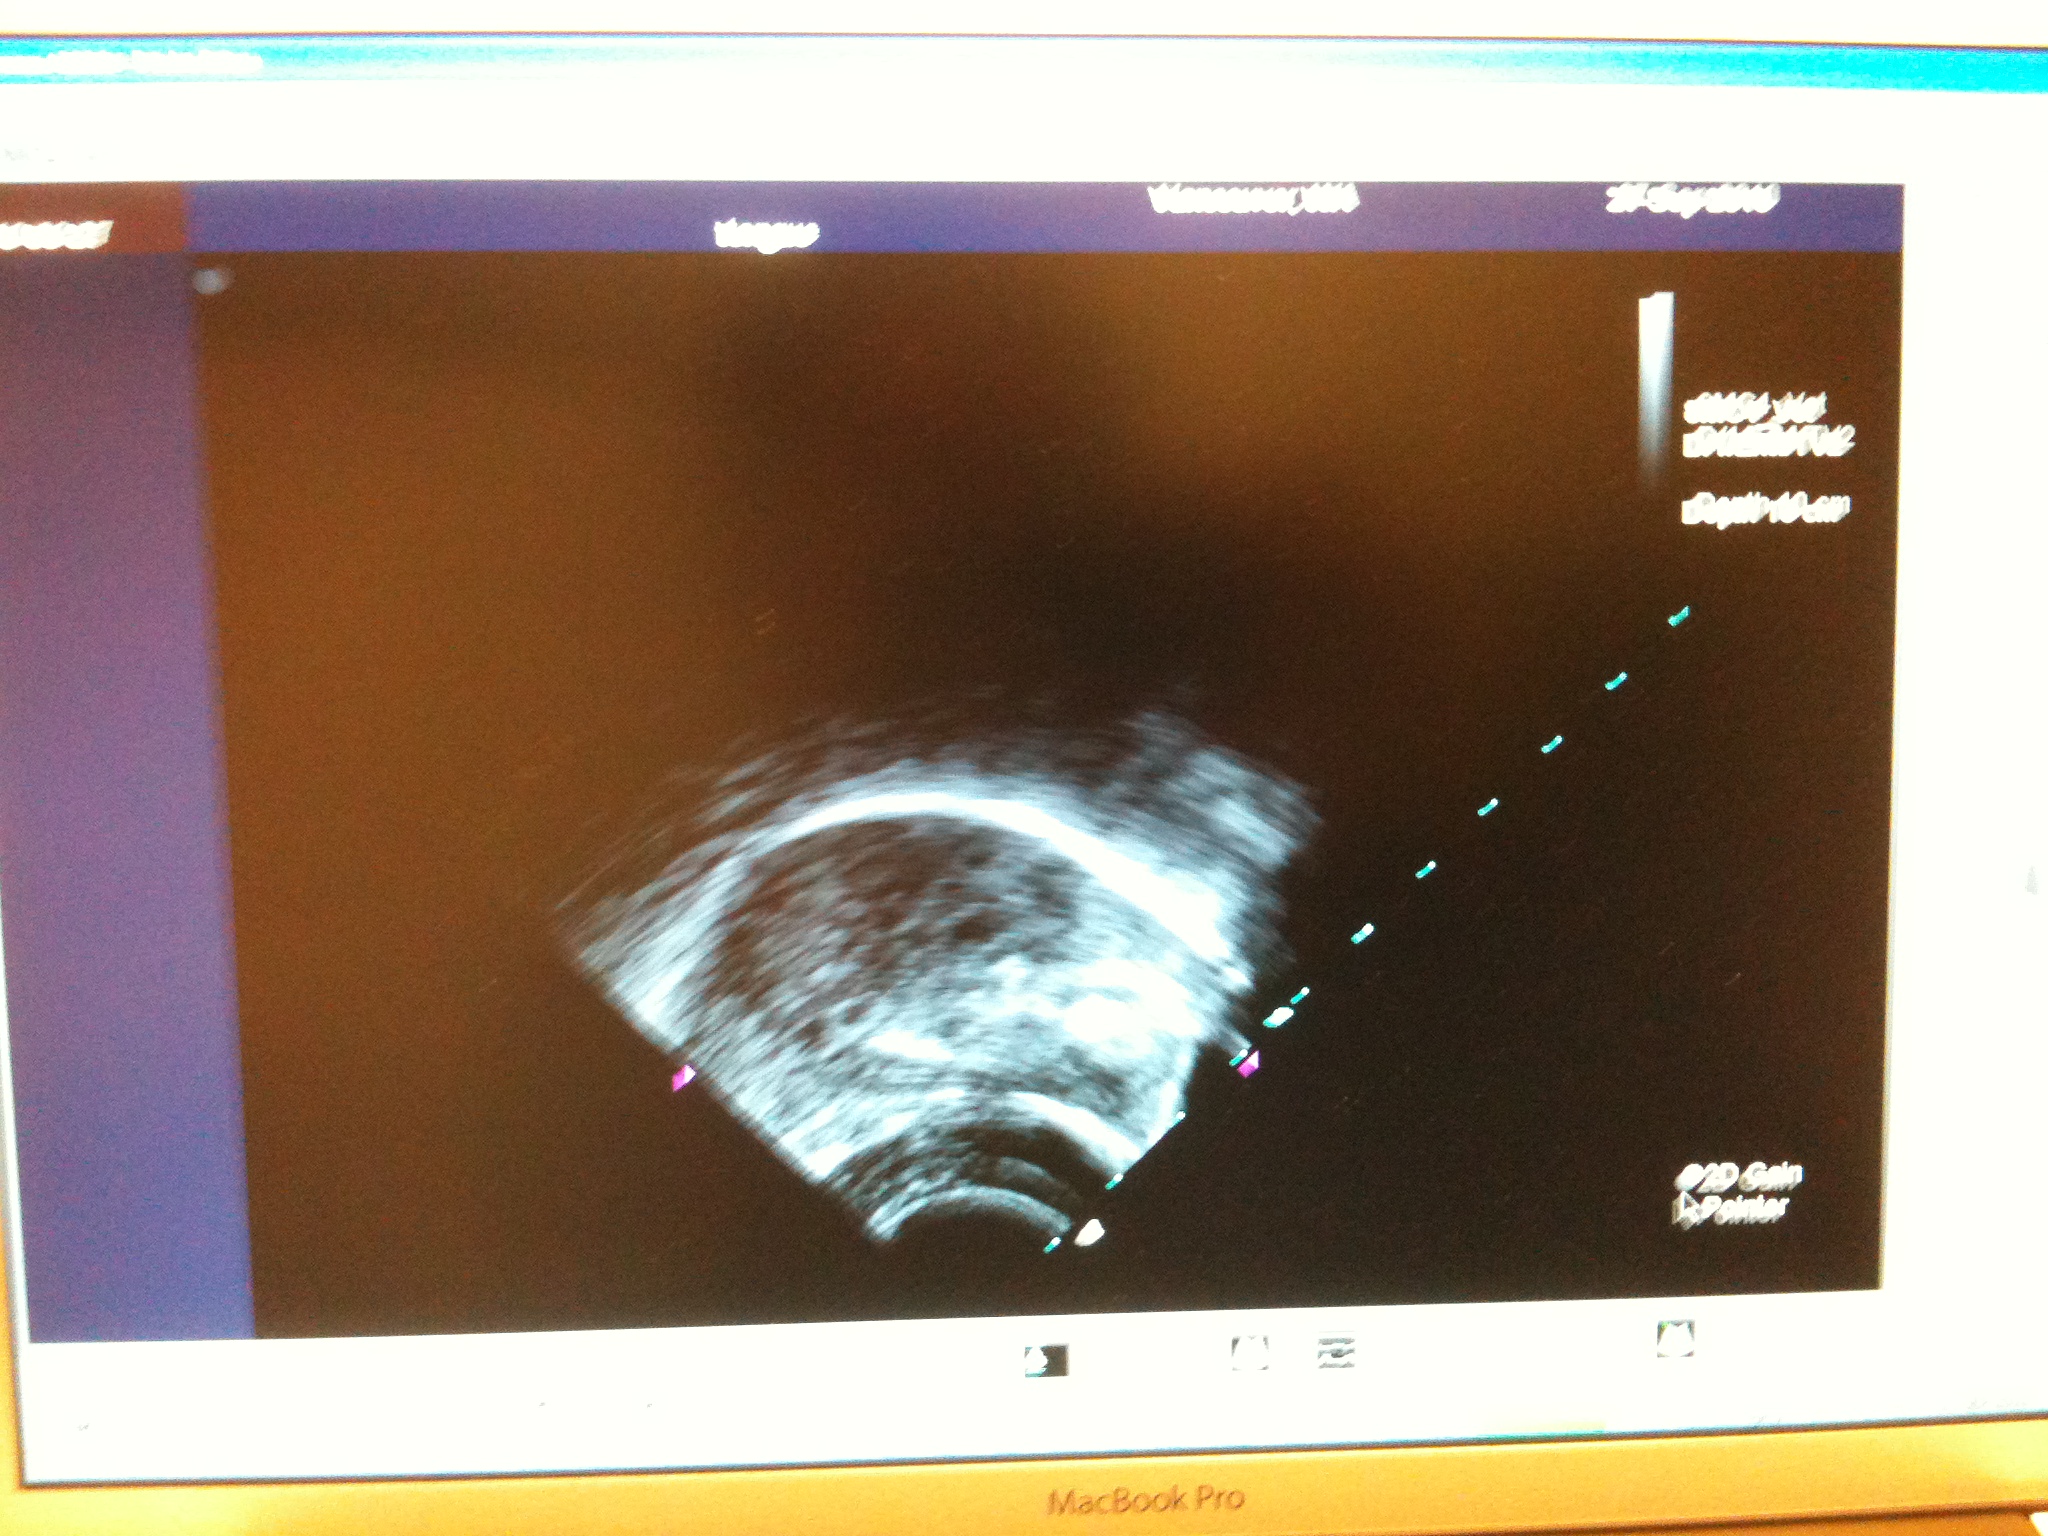
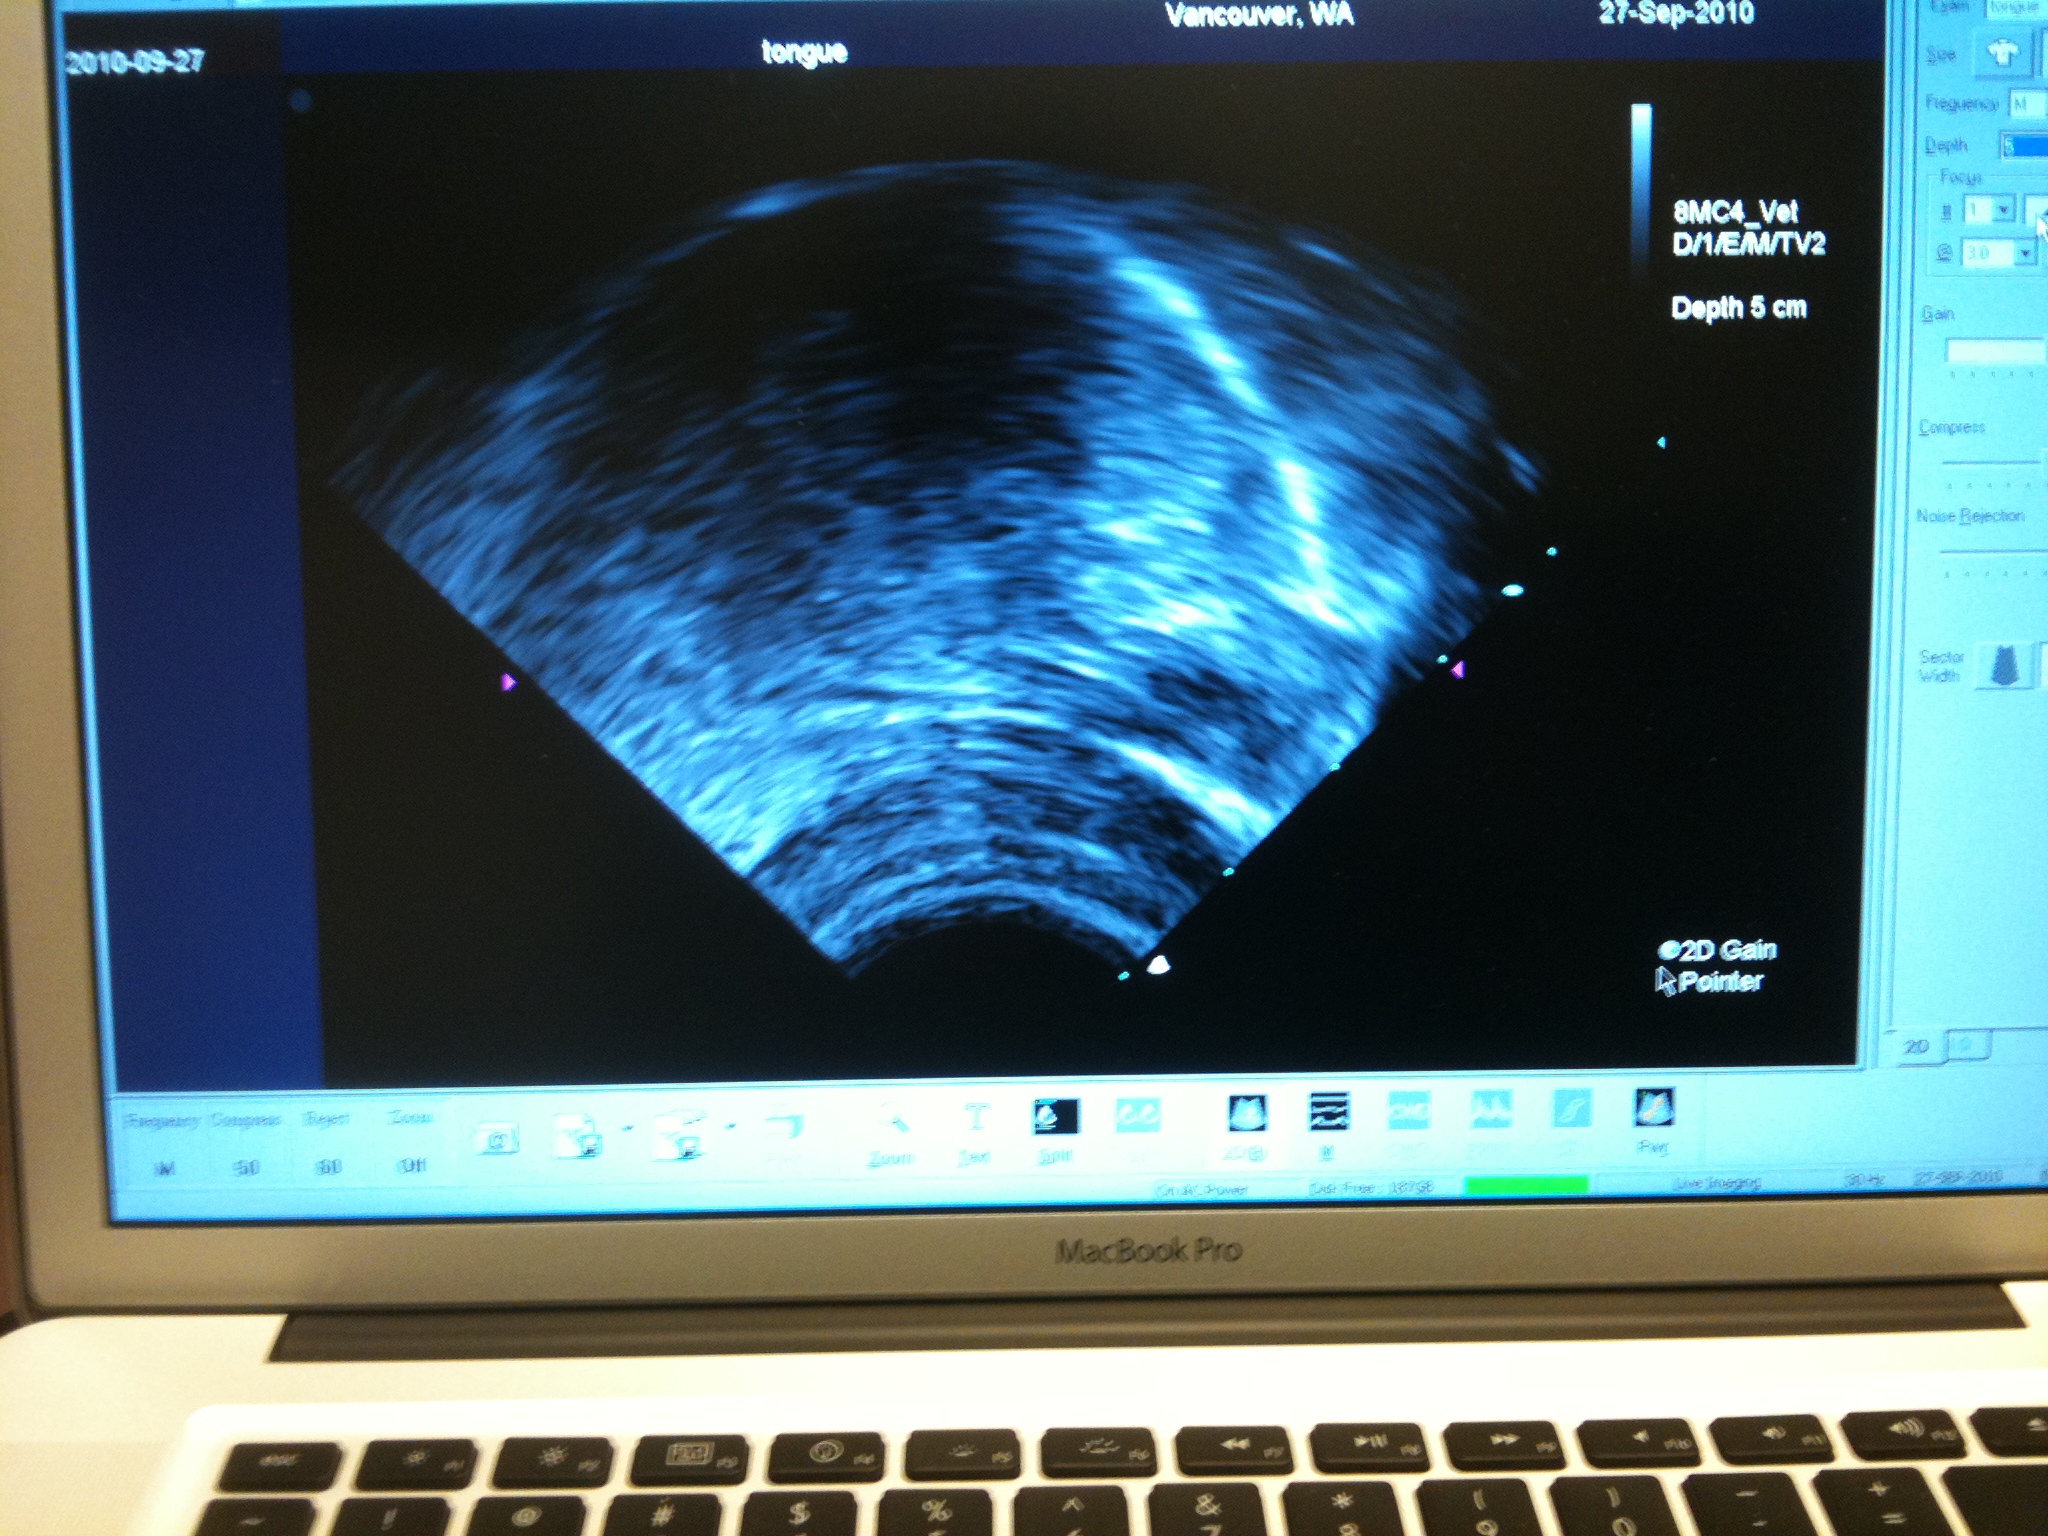
Figure 1. Left: depth set too high, right: depth set too low.
Figure 3 shows an appropriate amount of gel to put on the probe. If there is enough gel, the entire ultrasound fan (on the screen) should be mostly white (as in the picture), with no big black areas. The ultrasound helmet is used to hold the probe in a fixed position relative to the head.

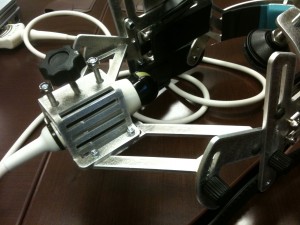
- Figure 3. Putting gel on the probe and placement of the probe in the helmet.
Figure 4 shows proper placement of the ultrasound probe under the chin. To produce a mid-sagittal ultrasound image, the probe is positioned in the center (in the mid-sagittal plane), with the flat sides facing sideways, and with the long axis of the probe roughly vertical. The indentation should be pointing forward. Tilting the probe forward or back will result in more anterior or posterior imaging, and will reveal the shadow of the mandible or the hyoid bone. Usually the probe is positioned so that these shadows are just out of view on either side of the ultrasound fan. It is conventional (but not universal) for the tongue to face to the right side of the image, and image orientation is an option in the software.

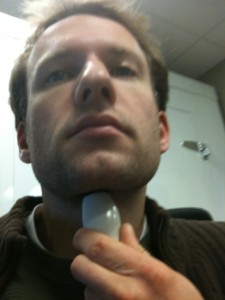
- Figure 4. Left: correct probe placement for mid-sagittal imaging,
Right: correct probe placement for coronal imaging
When the probe is placed correctly, the genioglossus muscle is visible as a fan-like shape in the lower front part of the tongue. The genioglossus is not very wide, so if the probe is off-center, it may not be visible, and this is a good indicator that the probe needs to be repositioned. You can also have your speaker produce a sound with a deeply grooved tongue dorsum (such as English [s] or bunched /ɹ/) and make sure the probe is imaging the groove, and not one of the sides of the tongue.
Ordinarily the palate is not visible to ultrasound, but it becomes visible when the subject places his/her tongue against the roof of the mouth (as in swallowing) or holds water in the mouth or drinks it through a straw. Often the surfaces that are easiest to see in the image the bone behind the hard palate and the air behind the soft palate (inside the nasal cavity). The outer surface of the mucosa that constitute the hard and soft palate are often nearly invisible.
Additional Imaging: IMAGING PLANES AND MODES
To image a coronal section of the tongue (which looks like a front-view of the tongue, in the same way that a sagittal section looks like a side view), the probe can be rotated 90 degrees, so that one of the flat sides faces forward, as in Figure 4. This may be useful for investigating laterals or grooved fricatives, or in the many other instances in which it is useful to know the location of a part of the tongue that is not in the mid-sagittal plane.
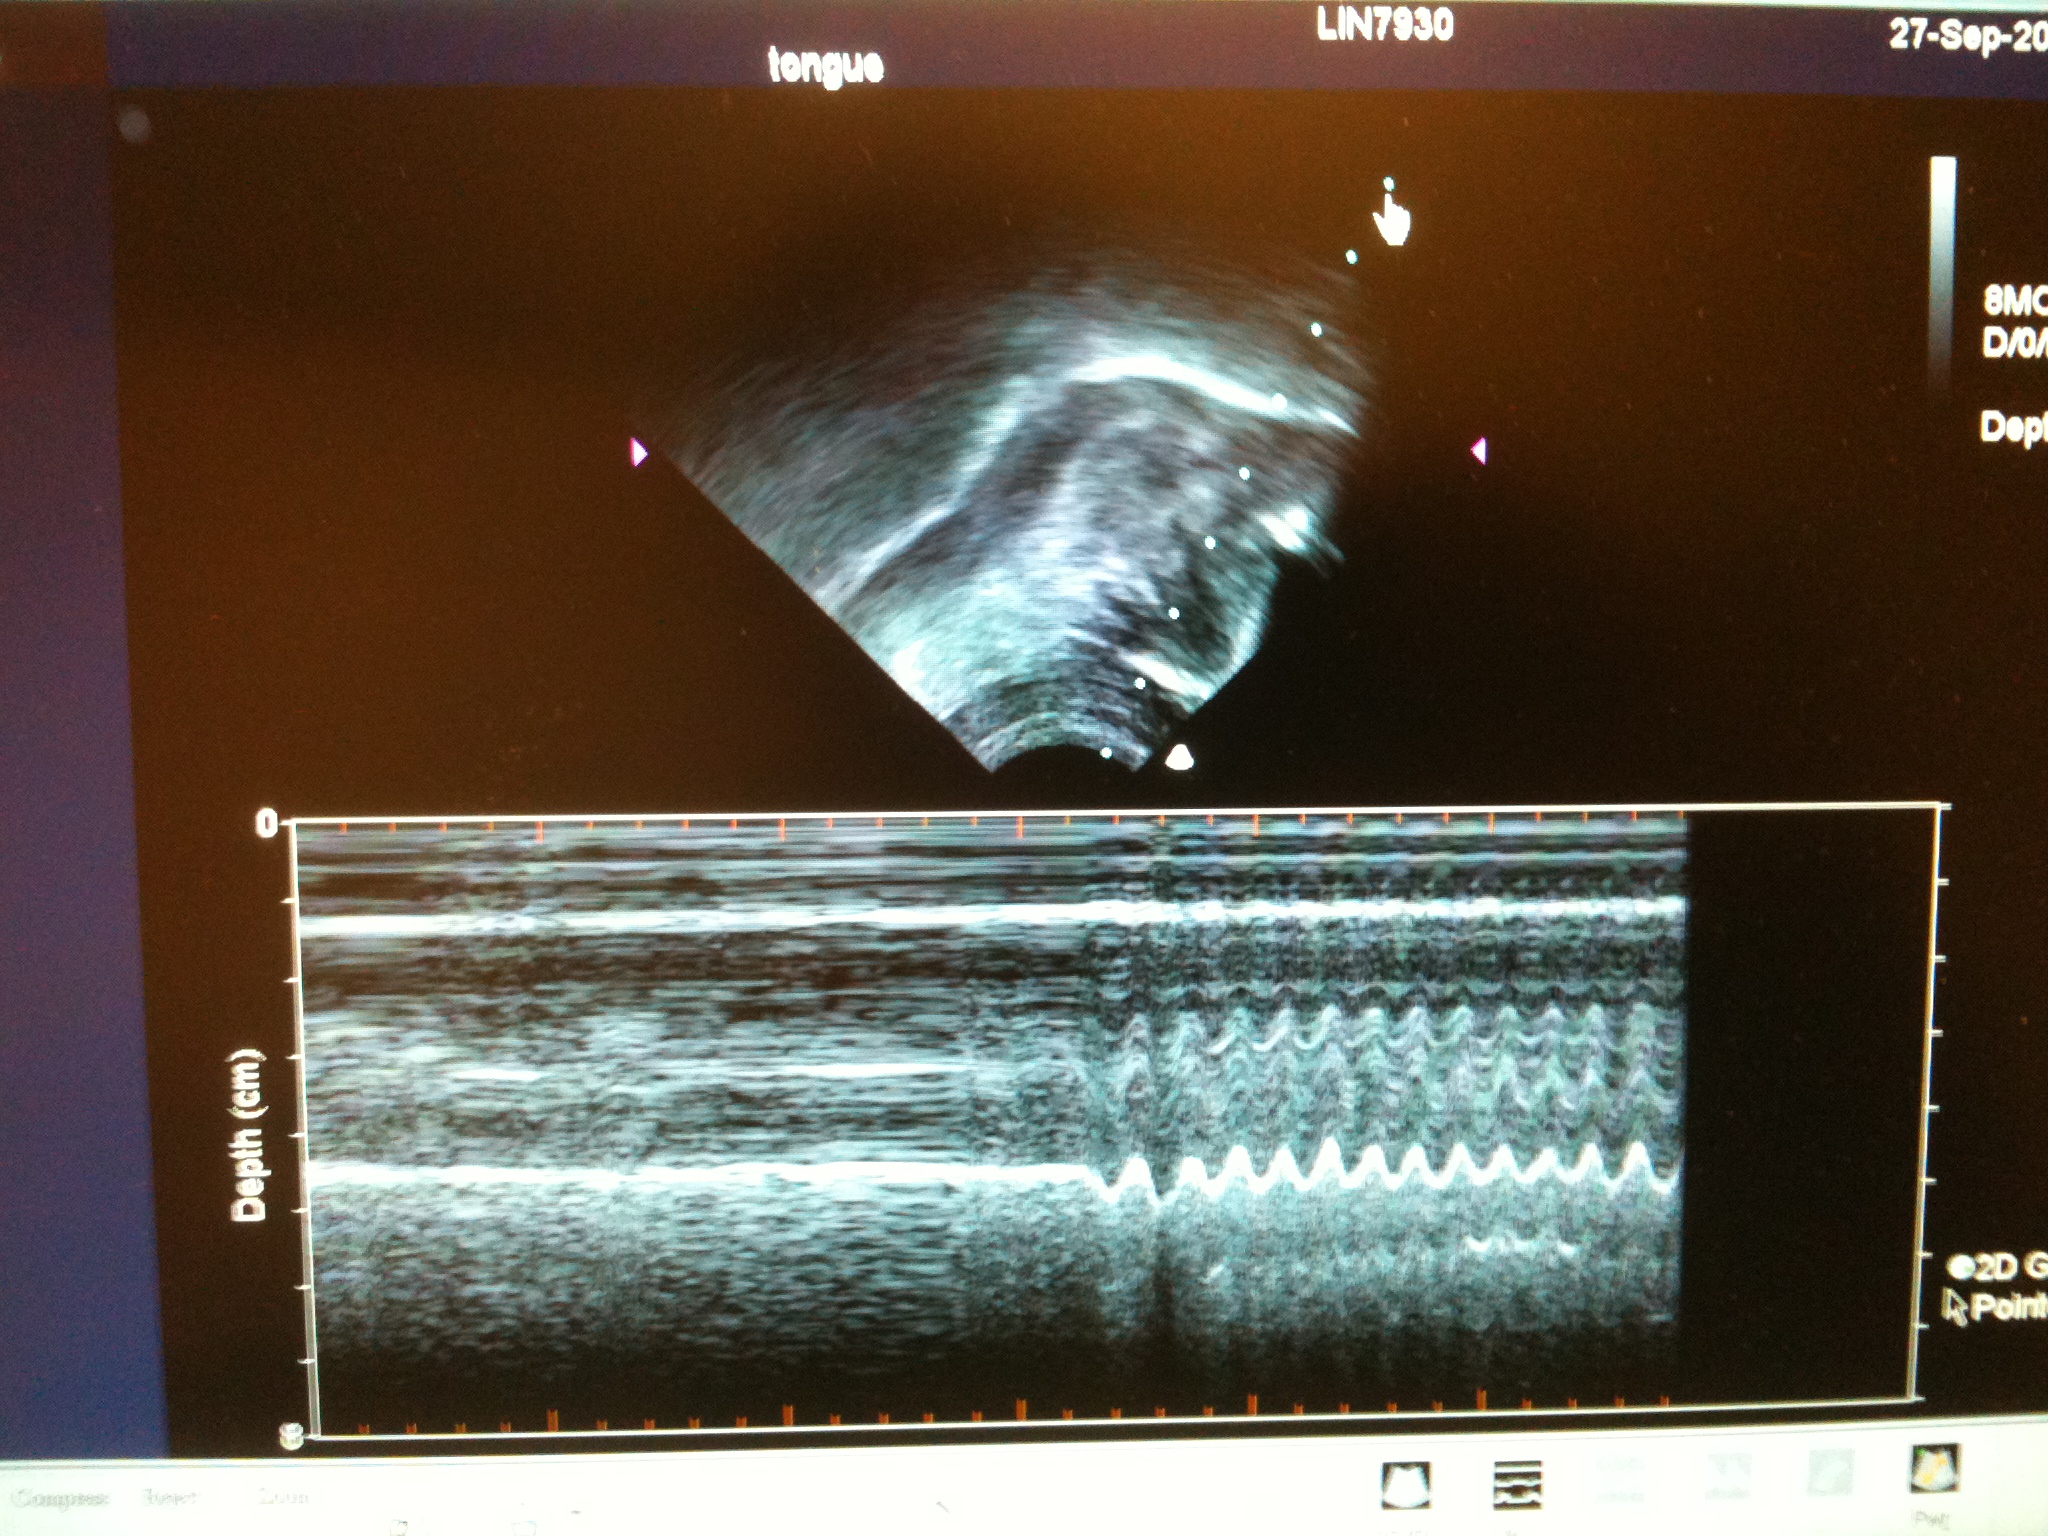
The typical two-dimensional fan-shaped ultrasound imaging mode is called B-mode. An alternative is one-dimensional M-mode, which images a single radius of the ultrasound fan and displays it horizontally (like a spectrogram, where the x-axis is time). This is useful for investigating fast things like trills. Click on the “M-mode” icon near the bottom of the window and use the mouse to drag the colored dots to the radius you want to image.
Controlling for Head Movement and Stabilization
Most recording situations call for preventing or measuring head movement. When no quantitative measurements need to be made, it may be appropriate to record ultrasound and audio only, without stabilizing the probe or recording video to correct for head movement. One case would be investigating bunched and retroflex /ɹ/ (although we used Palatron in the /ɹ/ study at Arizona).
Headset stabilization
The ultrasound headset can be used to prevent the probe from moving relative to the head. Advantages include not needing to record video (which requires a lot of resources) and not needing to use Palatron to transform your images, because head space and probe space are the same. Potential disadvantages are that it may be more difficult to get good tongue images using the helmet, and that some subjects may not like wearing the helmet, or may not fit in the helmet.
Refer to the headset manual for instructions. It takes some practice to get good at it. It’s good to keep in mind the recommended sequence (from page 18 of the manual):
- vertical alignment (the knobs on the top of the head) to get the probe holder at the right height
- horizontal alignment (after positioning the cheekbone pads on the cheekbones) to get the headset away from the ears
- the headband (so that most of the pressure is between the cheekbones and the back of the head
- lateral stabilization (the sides of the head)
- probe adjustment
This list is to remind you of the order to go in, not a substitute for the actual instructions and practice.
Please note that it may take up to 10 minutes to properly adjust a headset onto a participant. Removal of the headset takes significantly less time.
Headrest stabilization
An alternative to the ultrasound headset is the headrest combined with an Arduino-based head movement tracking system. The headrest helps people stay still, and they wear a device that tracks changes in head orientation (so you can skip those parts of your recording in your analysis). It is slightly more complicated to use this method, but it is potentially easier for the participant.
Palatron “Stabilization”
Please note we don’t usually do this anymore. The Palatron system makes it possible to allow and then correct for head movement. The subject and the probe both wear a stick with two dots on it, which the Palatron algorithm (implemented by the Palatoglossatron program) uses to correct for movement. The Palatron algorithm makes a lot of assumptions about the location of the dots and what they represent, so it is important to be careful to make sure that these assumptions will be accurate:
- The glasses represent the location of the non-moving parts of the vocal tract, so it is important that they not move on the subjects head.
- The algorithm assumes that the four dots move in two dimensions, so it is important that the two sticks with dots on them are always in the mid-sagittal plane.
- For the camera to accurately represent the plane in which the dots move, it needs to be positioned so that it is aimed perpendicular to the mid-sagittal plane, and located between the four dots.
To adjust the camera’s horizontal position, adjust the arm. To adjust the camera’s height, undo the latch on the monopod and raise or lower the camera. After the other adjustments have been made, the camera’s angle should be adjusted by unscrewing the knob at the base of the monopod and moving the monopod and then retightening it. Be careful not to over-tighten.
Supplementary data: Video Data
The video source is a closed-circuit TV camera (Figure 6). It is a color camera, but Ultraspeech currently treats it as grayscale video. The camera lens is adjustable for focus, iris, and zoom. You should adjust focus until your subject is in focus, adjust iris as needed depending on the lighting condition, and adjust zoom depending on your needs. Since the microphone and the camera both use USB, and the T3000 has only one USB port, they need to connect using a USB hub (Figure 7).
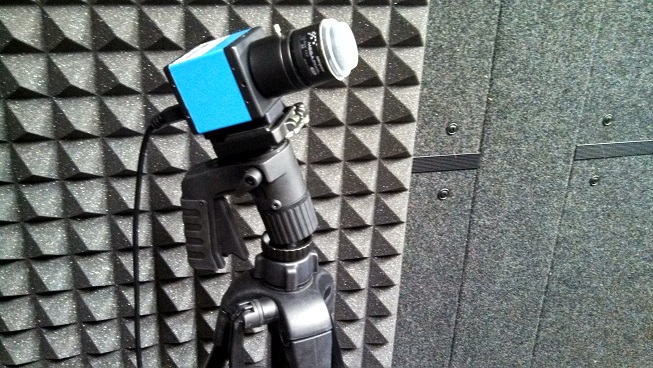
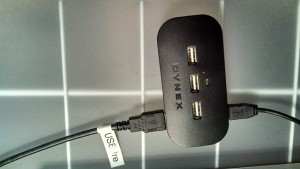
- Figure 6 and 7. Left: The camera used for face video, and Right: A USB hub (used for connections to the preamp and camera, for example).
Recording Ultrasound and Video Images
The Terason ultrasound application is intended for diagnostic ultrasound, which does not require synchronization with other audio and video channels. To collect speech data on the T3000, we use Ultraspeech, a program made by Thomas Hueber during his PhD at ESPCI ParisTech. It collects the ultrasound data stream internally and synchronizes it with audio and a second video source (probably a camera view of the speaker’s face).
At the Ultraspeech web site, you can register to get access to the Ultraspeech wiki, which contains documentation and a lot of useful information. You can also sign up for the mailing list.
To start Ultraspeech, first make sure that the ultrasound probe is connected to the machine, that the USBPre is connected to the USB port (probably via the USB hub), and that a USB camera is also connected to the USB hub (if you are using a camera). You cannot plug them in after Ultraspeech starts. Click the “Ultraspeech 1.3” icon on the Desktop. To start the ultrasound video stream, click “Ultrasound… Start ultrasound”.
If you are collecting camera images, click “Camera… Camera Source”. Device Name should be “DFx 21BU04” for the big blue CCTV camera (shown in the picture below) or “DFM 22BUC03-ML” for the little board camera. For both cameras, Video Format should be set to “Y800 (640×480)” and Frame Rate (FPS) should be 60.00024. Then click “Camera… Start Camera” to start the camera. You should see the camera view to the right of the ultrasound view. Adjust the focus as necessary. For the blue camera, you can also adjust zoom and iris.
You can change the settings for either of these by selecting the “Settings” options on the same menus. Once you have started the ultrasound and camera, a number of windows will appear. The main Ultraspeech window is shown in Figure 8, and is accompanied by several other windows, including the Project manager, Ultrasound settings, and Audio settings windows.
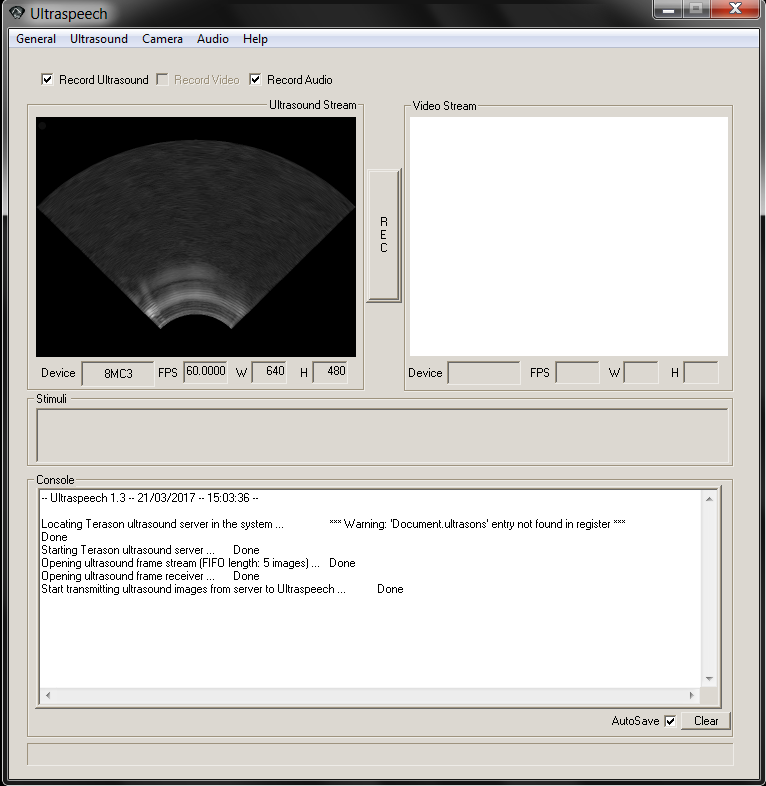
Figure 8. Main Ultraspeech window.
First, in the Ultrasound settings window, click the “Terason software” button (Figure 9). The Terason T3000 – Probe Data window will appear (Figure 10), generally behind the Ultraspeech windows. Click the “Size…L” t-shirt icon, to load default settings that will work for most average-sized participants. For some reason, changing the exam size to “L” is necessary in order for Terason to supply a frame rate over 60fps. To verify that this has worked, check that it says FPS: 60.0000 under the ultrasound view (as in Figure 8). If your participant’s tongue surface is not entirely visible (e.g. moving off the screen), adjust “Depth” settings as required. Once adjustments have been made, navigate back to the Ultrasound settings window (Figure 9), and click the “Terason software” button again to close the Probe Data window. Click “Apply”.
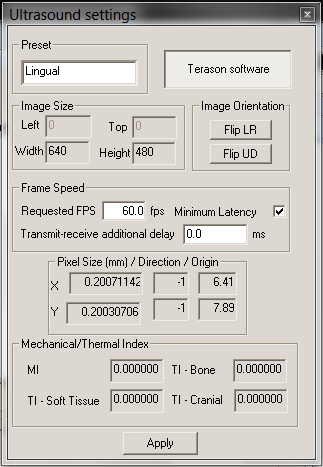
Figure 9. Ultrasound settings window provides access to the Terason T3000 ultrasound probe settings window (via the “Terason software” button).

Figure 10. Terason T3000 Probe Data window, for adjustments to height, depth, etc., based on participant.
Next, in the Project manager window (Figure 11), you will need to make a number of changes:
- First, click “Browse”, then, in the Browse For Folder window (Figure 12), navigate to the appropriate folder where you will store your files (for our purposes, this is …Computer…DATA (D:), the solid state drive, because the regular hard drive isn’t fast enough for what we are doing).
- Click “Make New Folder” and give your project a file name (TIP: keep your file name simple, as it will be used for all of your ultrasound, video, and audio file names. Don’t use spaces or underscores, because those will mess things up down the road).
- Click “OK”.
- In the Project manager window, enter this file name in the “Basename” box. As illustrated in Figure 11, you should now see matching file names for both the “Capture Directory” and the “Basename”.
- Under Recording Options, make sure “RAM-to-disk (on)” is unchecked.
- Click “Apply”.
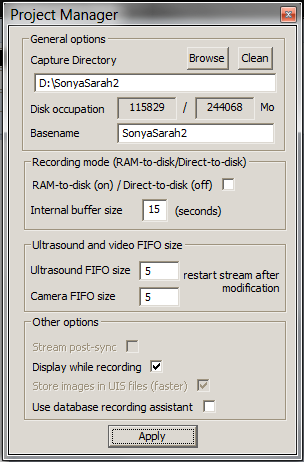
Figure 11. Project manager window.
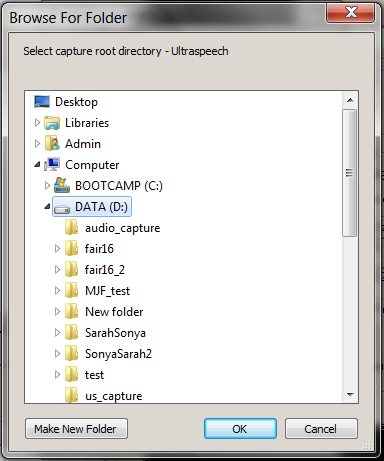
Figure 12. Browse For Folder window.
Finally, you will need to make a few changes in the Audio settings window (Figure 13):
- Make sure that the “Device” is USBPre 2.0 ASIO driver (this is the microphone preamp located on the other side of the sound booth window, which should be plugged into a USB hub, plugged into the Terason T3000)
- Change “Sampling rate” to 44100, “Resolution” to 32 or 16, “Nb channels” to 1, and leave “Buffer size” at 256.
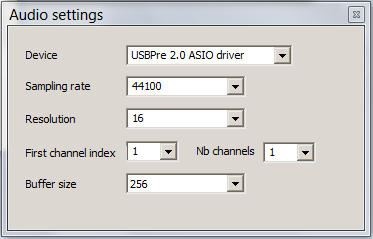
Figure 13. Audio settings window.
After ensuring the probe placement for your participant, camera placement (if applicable), and mic placement and mic levels (looking at the green lights on the USBpre while your speaker speaks), you are now ready to press the “REC” (record) button, in the main Ultraspeech window (Figure 8, above).
Loading your Recorded Data to the PHON Server
You will find your files in the your folder in the sub-folders “audio_capture”, “us_capture”, and “video_capture” (if you recorded video data), along with a report on the data collection. You will want to upload these files to /phon server using WinSCP almost immediately. You can upload them to your own directory, or you can use /phon/data_upload as a staging area.
The us_capture and video_capture directories will each include a single uis archive file. Before you can analyze your images, you will need to extract them from these archives.
The most straightforward way to handle these files is to extract them using Ultraspeech immediately after your recording. Click General… Expand Archive Files, verify that the right directory is listed, and them click “Yes”. After it is done extracting, browse to your folder (in Windows, not Ultraspeech), and delete the uis file from us_capture (and also from video_capture, if you recorded video). Before you delete, you may want to ensure that the size of each uis file is exactly half the size of the whole directory it’s in, in order to verify that it has been completely expanded. Next, two-finger-click (right click) your folder, and choose 7-Zip… Add to “yourfoldername.zip” and wait for your zip file to be created. Then upload it using WinSCP.
Once you have verified your data on another computer, delete your directory and files from the t3000’s D:\DATA directory as soon as possible. It fills up quickly if files don’t get deleted, and that can make someone else’s recording crash.
If you have a lot of back-to-back recordings scheduled, it may be necessary to move your uis files off the t3000 before extracting them (in order to quickly make room for new recordings). It is possible to expand them after they have been transfered to phon, but currently only Jeff is allowed to do this.