
If you are just editing textgrids, click here to jump ahead to that section
After recording — move files to server and copy log file:
-
- Copy output files from Ultraspeech onto tier 3 (the one that starts with “hss”)
- Using cox-515-4 or 5, create a directory in
phon/cr/for the participant’s files, and make sure it is group rwx (can read, write and execute). Inside of that directory, create a subfolder called audio_capture, and make sure it also is group rwx - Copy the log file from the sd card to the participant’s directory (e.g., /phon/cr/cr01/LOG00790.TXT), and make sure it is group readable.
- Copy the wav file into data_upload on the phon server from any computer, and then copy it into the audio_capture folder using cox-515-4 or 5. (If you copy it from the ultrasound machine, you won’t own it and can’t change the permissions). Make sure it is group readable. One way to do this is to locate the file in the file browser (Dolphin on the lab computers), right click, and choose Properties (or select the file and hit alt+return). Click on the Permissions tab and change the Group settings to “Can Read”.
- Alternately, if you are still in the participant’s directory in the terminal window, you can type (replacing the file name):
chmod g+r cr01.wav
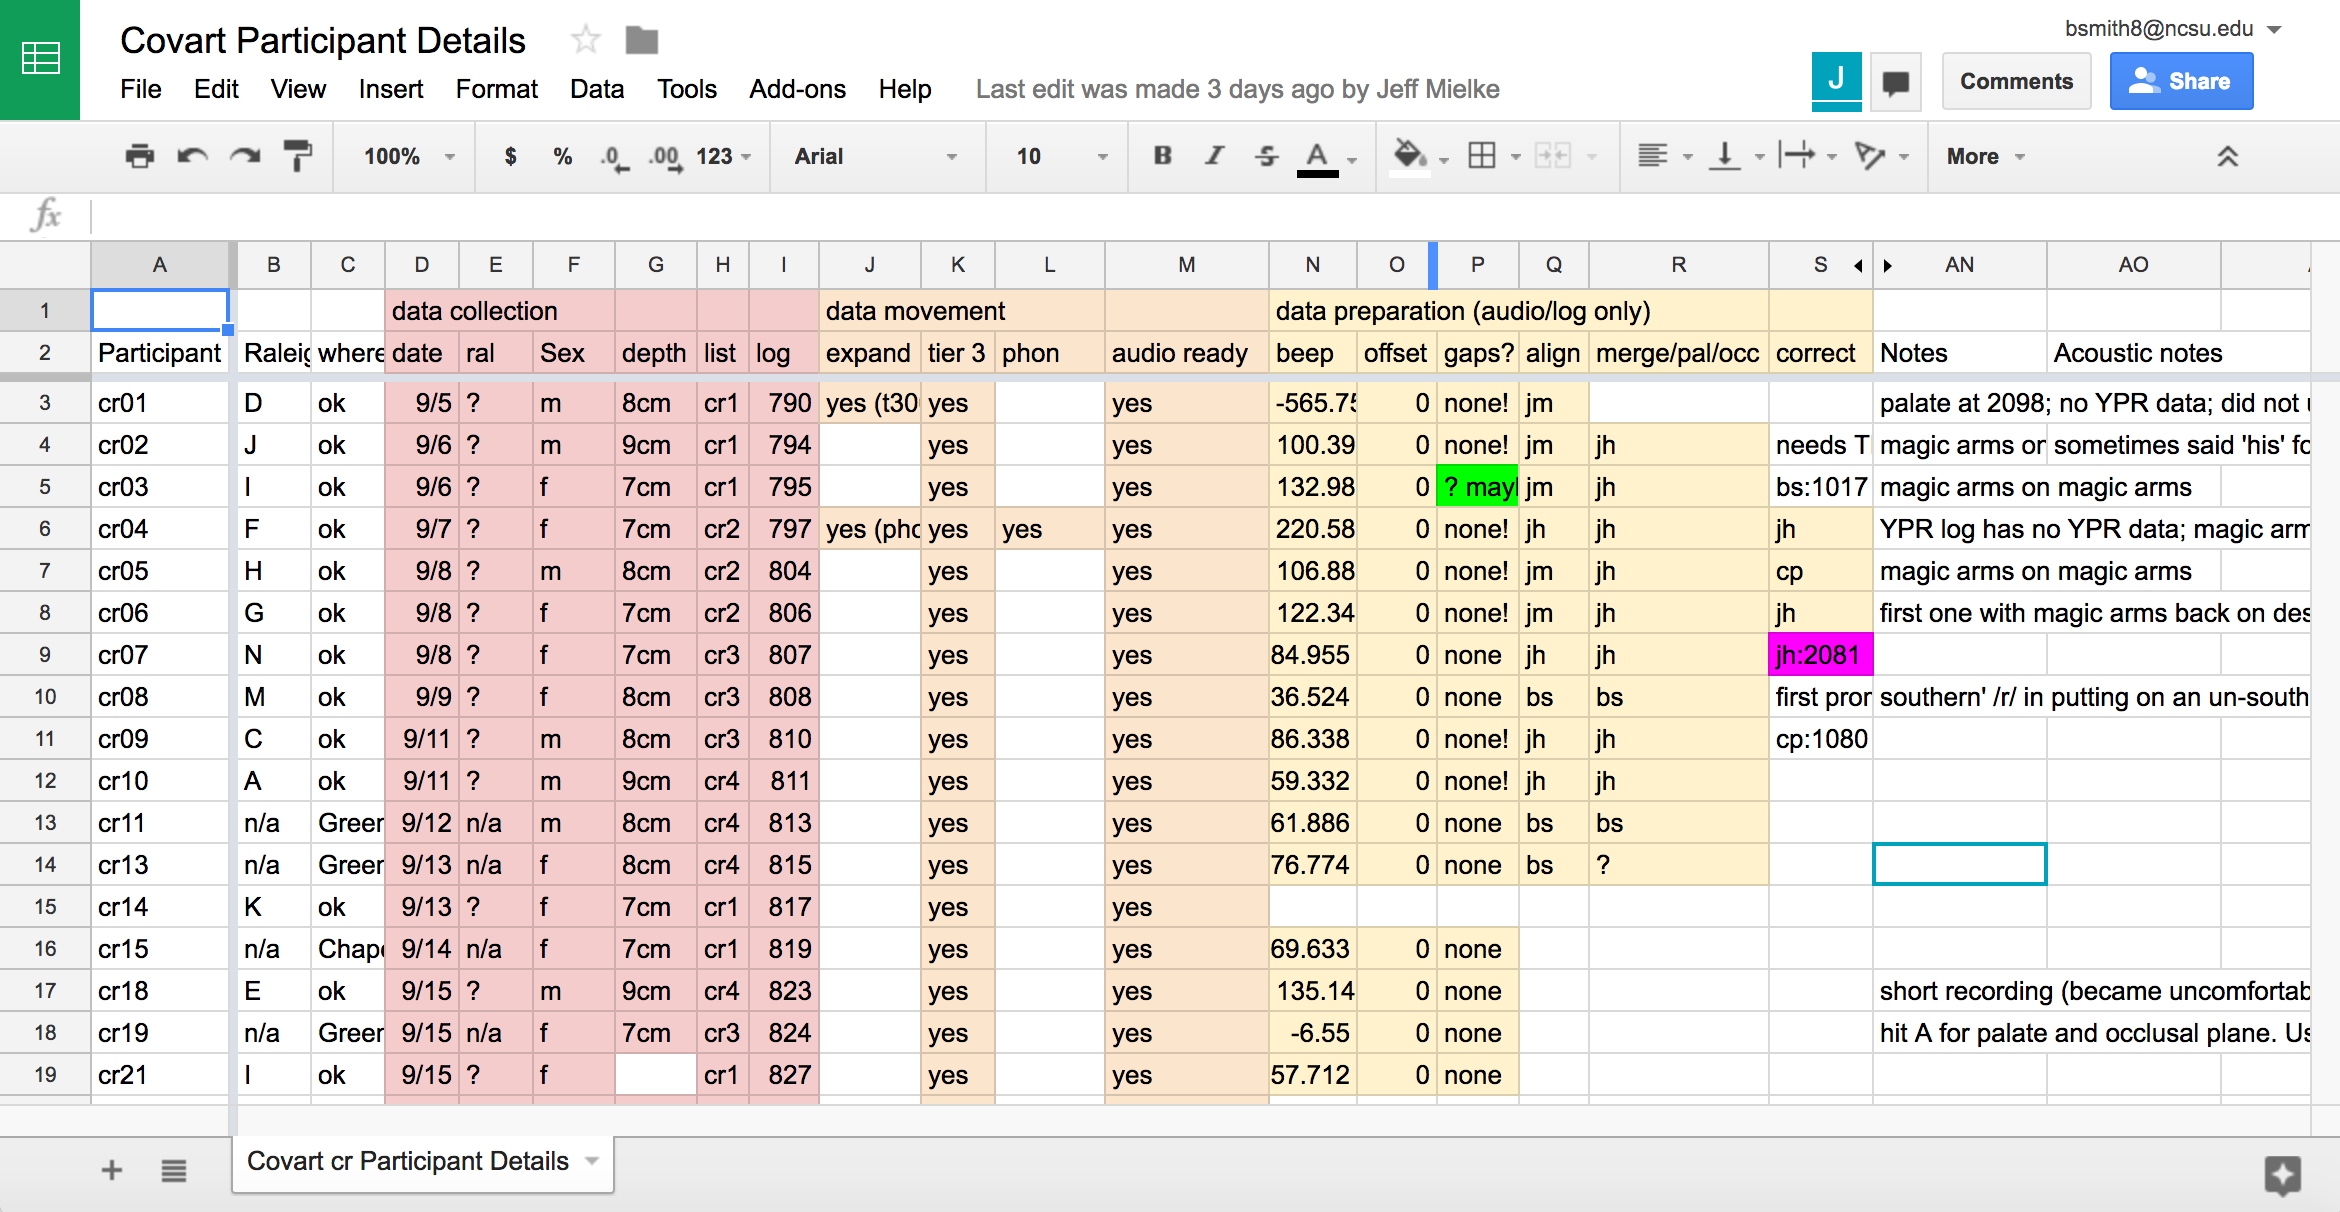
- After each of these steps, update the Covart Participant Details with the appropriate numbers or your initials, to show that you have compled that step, and to help figure out who to ask in case you forgot to change the permissions for the group.
Setting up and repairing the TextGrid:
- Run the
parselog.pyscript with “--beep 0” and the appropriate LOG00XXX.TXT file, just to see the times when the beeps occur (after cd-ing into the participant’s main directory):cd /phon/covart/cr/cr01 python /phon/scripts/parselog.py --input LOG00790.TXT --output cr01 --beep 0 --threshold 2
- Running
parselog.pycreates a TextGrid that is not synchronized with the sound, and outputs the arduino information, including alignment (tare), beeps (beep), and when the right arrow was clicked (next). - It should look something like this:
tare at 625.831164: (-0.12, -0.41, 0.28)
beep at 668.201736: (0.53, -1.09, 0.07)
beep at 715.734612: (-0.52, 0.15, -0.33)
next at 926.913126
next at 932.82192
next at 938.80386
next at 944.05935
adjusting times by -715.734612
- The first [tare] tells you how long the arduino was plugged in before the first alignment, which may have occurred before the recording began. The last [beep] before the [next] button was pressed should co-occur with the occlusal plane recording, but may occur later in some cases. The difference in time between the last [beep] and the first [next] should be approximately how much earlier you should expect to see the beep before the first prompt was spoken in the recording (plus however long the participant took to start speaking after pressing [next]). In this example, we would estimate that the beep is around 200 seconds or so before the first prompt (926-715=211).
- To open a Praat window, use the terminal window, and type:
praat &
- Open the crXX_log.TextGrid with the crXX.wav file in Praat and locate the last beep (which should be the occlusal plane in recent recordings) in the wav file.
- Looking at the prompt tier, you can see what the first utterance is supposed to be (hint, it’s the first labeled prompt interval). Look at the waveform for where the talking seems to occur at regularly spaced intervals, and zoom into the first of these, playing the recording to be sure the speech corresponds to the first prompt text.
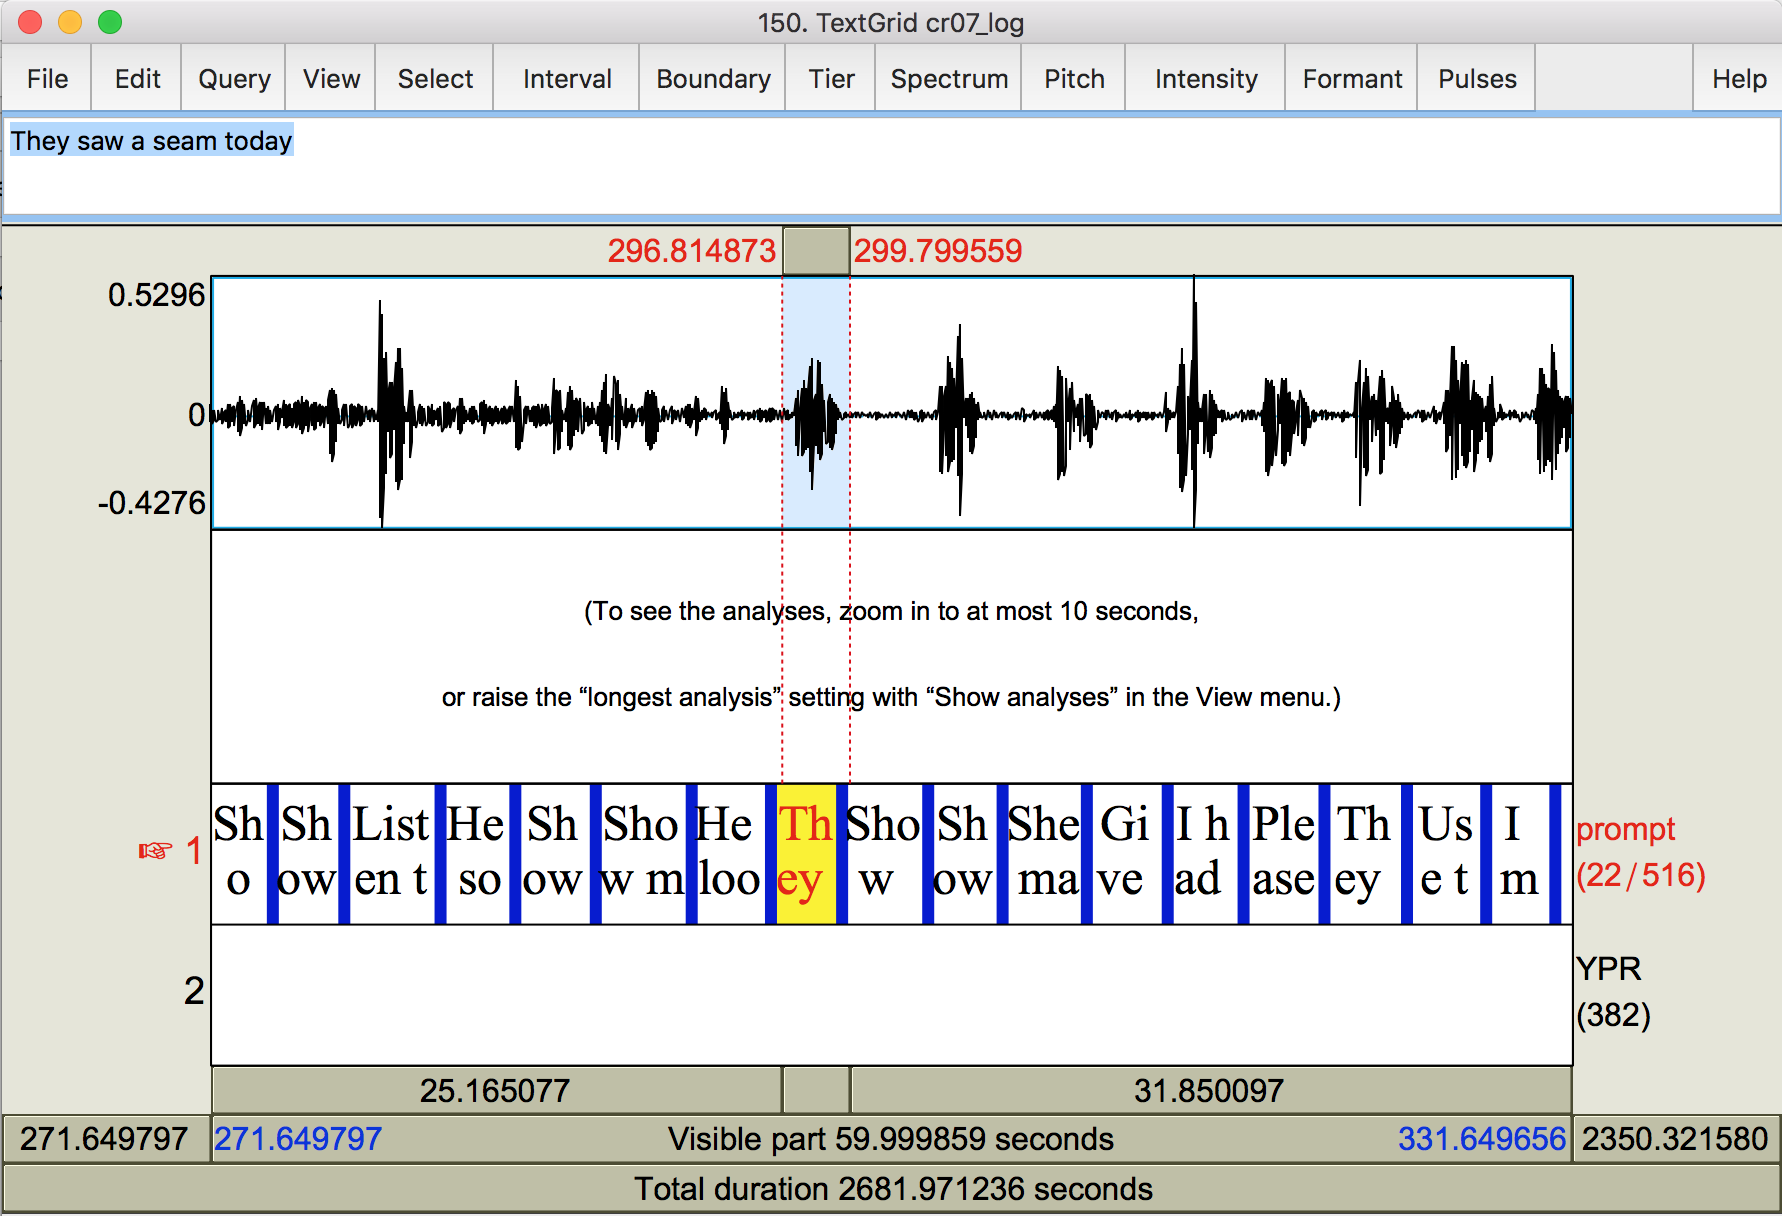
There will be irregular discussion before the speaker begins reading the prompts. The prompts will be more regularly spaced.
- Scroll backwards through the recording until you reach the last beep (approximately the difference between the first [next] and the last [beep] from the parselog.py output). Make sure it is the very last beep before the participant starts reading the first prompt. Occasionally, there will be a double-long portion for the first part of the beep. If that seems to be the case, use the time from the second beginning rather than the first.
- Note that in this example file, we found the first prompt at around 296 seconds, and identified the last beep at around 85 seconds. 296-85=211, which is what we had predicted from the parselog output!
These are the beeps you’re looking for.
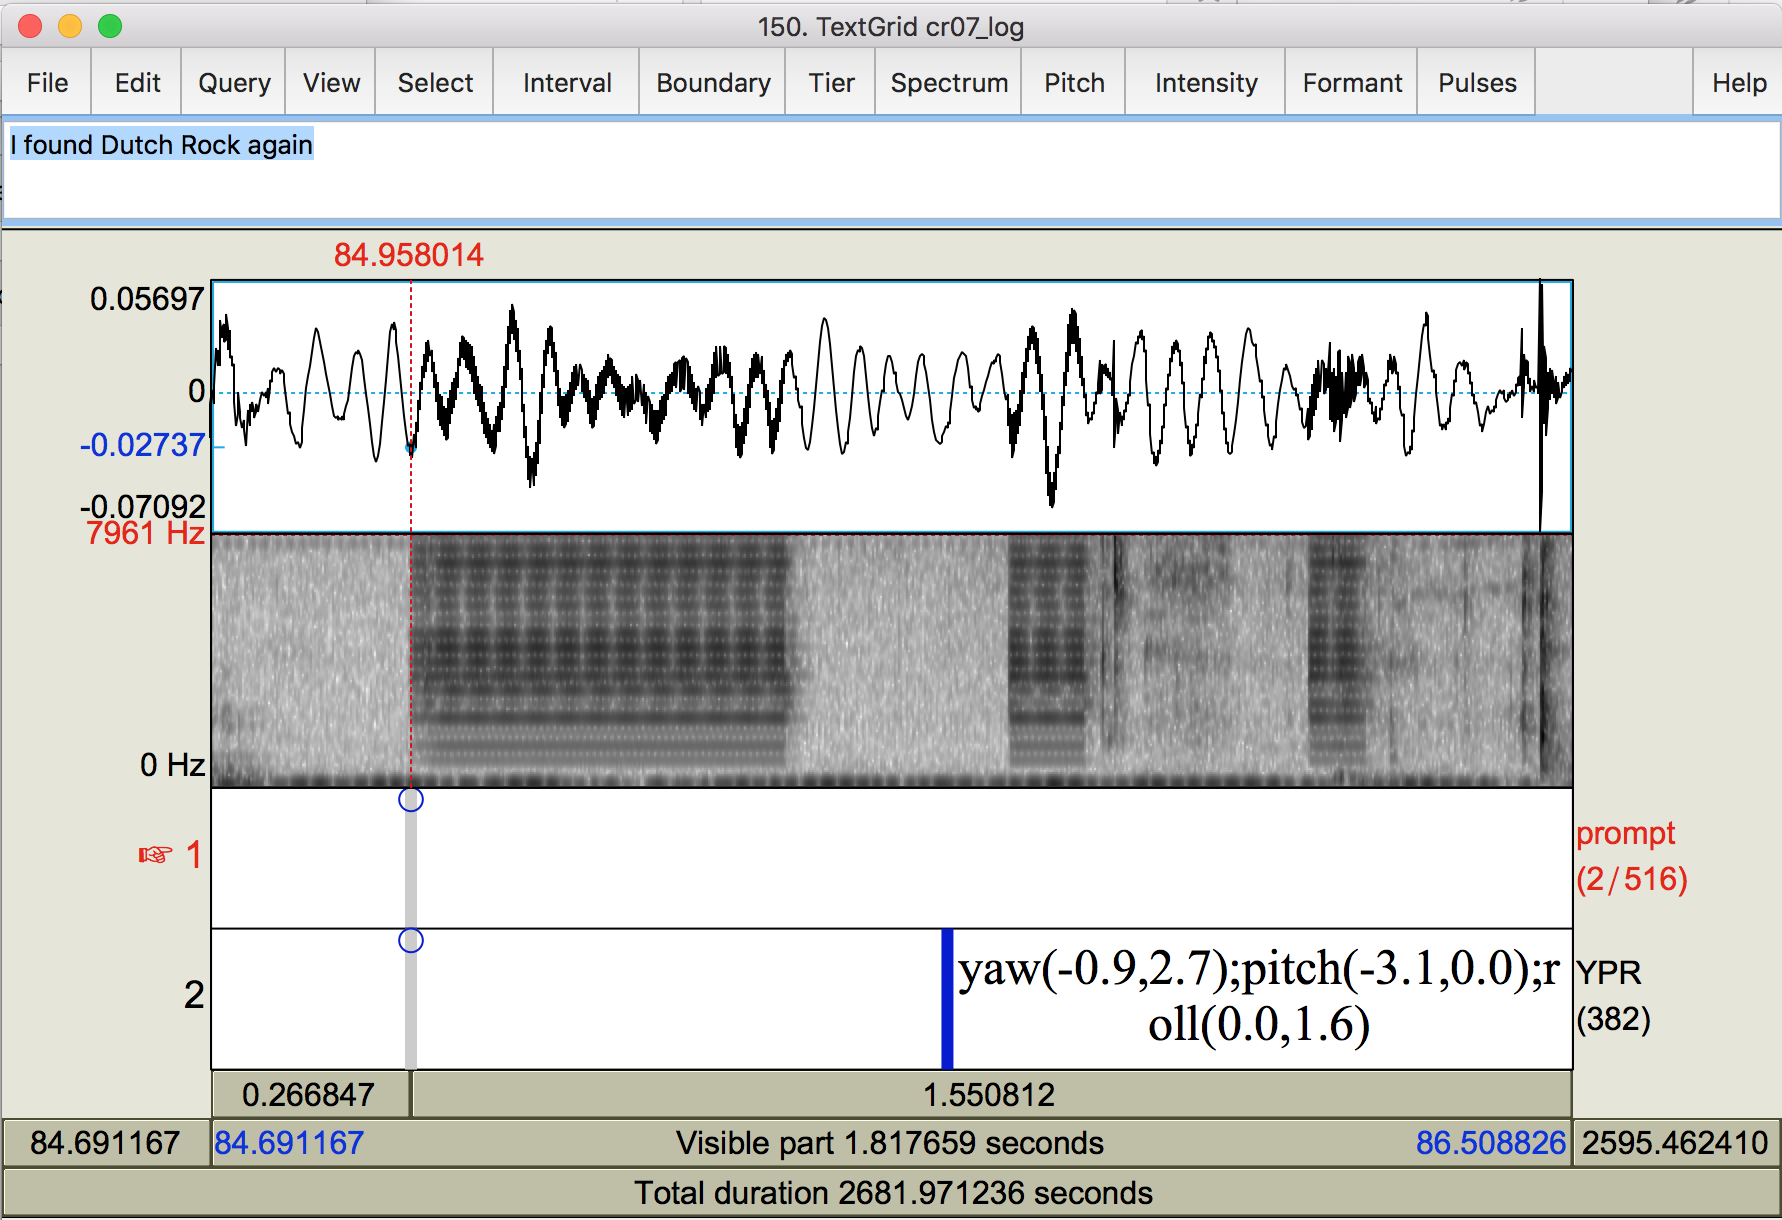
- Once you’ve located the last beep, note its start time in the wav file, writing it in the participant speadsheet, then run parselog.py again, replacing the 0 with the start time of the last beep.
- Scoll forward to the last few trials to make sure that they are aligned properly. That is, the participant should not start reading the prompt before the prompt appears on the screen. If the prompt is segmented AFTER the onset of talking, make a note of it in the spreadsheet under gaps?
- (optional) offset: shift the prompt tier left (positive) or right (negative) by a fixed second duration in case there is a big alignment problem caused by speakers anticipating the prompts before they have pressed the forward button.
python /phon/scripts/parselog.py --input LOG00790.TXT --output cr01 --offset 0.0 --beep 84.958 --threshold 2
Forced Alignment
- Once the beep is aligned, the prompts should be lined up under the correct trial. If this is not the case, check for a later beep (sometimes there’s accidentally a double beep) and redo steps above.
- Once the prompts are lined up with each trial, use the forced aligner. Copy the dictionaries from cr11 (specifically from this talker, because I know these have thre correct permissions) into the current participant’s main directory:
cp /phon/covart/cr/cr11/dict.restricted /phon/covart/cr/cr01/
cp /phon/covart/cr/cr11/dict.test /phon/covart/cr/cr01/
cp /phon/covart/cr/cr11/dict.replace /phon/covart/cr/cr01/
- Make sure you are still in the participant’s main directory, and run the following:
python /phon/p2fa/align_lab2.py audio_capture/cr01.wav cr01_log.TextGrid cr01_aligned.TextGrid
- It will take 15-30 minutes for this to run, so take a quick break or do some other work (take advantage of the time to update the Participant Details, start a different speaker in a new terminal window, or segment an older speaker you haven’t yet finished).
- Read cr01_aligned.TextGrid and cr01_log.Textgrid into Praat. If they don’t appear in that order in the object list, open them again. Merge them into one textgrid.
- Generously segment the “palate” and “occlusal” (both lowercase and not in quotes) intervals in the phone tier of the merged textgrid.
- The last beep before the prompts begin should be the occlusal plane (unless indicated in the spreadsheet). Create an interval around the area where the experimenter says ‘there’s the occlusal plane’, including a good couple seconds before it, and mark it “occlusal”.
- The beep prior to the occlusal plane should be the palate (unless indicated in the spreadsheet). Segment a good few seconds prior to and including the beep, and mark it “palate”.
- Save the merged textgrid as cr01.TextGrid in the participant’s main directory. [NOTE THAT THESE NAMING CONVENTIONS DIFFER FROM THE MAY PROTOCOL, WHICH WOULD HAVE CALLED THE ALIGNED TEXTGRID cr01.TextGrid AND WOULD HAVE CALLED THE MERGED ONE cr01_merged.TextGrid.]
- After you have saved the TextGrid, make sure that others in the ncsu group can read and write. One way to do this is to locate the file in the file browser (Dolphin on the lab computers), right click, and choose Properties (or select the file and hit alt+return). Click on the Permissions tab and change the Group settings to “Can Read & Write”.
- Alternately, if you are still in the participant’s directory in the terminal window, you can type (replacing the file name):
chmod g+rw cr01.TextGrid
Correct the textgrid using the editor_align_cr script
- In your terminal window, navigate to the speaker’s directory that you are working on. This is important, otherwise
editor_align_cr.praatdoesn’t work correctly.cd /phon/covart/cr/cr01
- Open Praat by typing
praat &into the Terminal window. - Repeat these two steps every time you start correcting a new speaker. If you start a new speaker, close Praat, cd to the new directory, then reopen Praat.
- Open cr??.TextGrid and cr??.wav in Praat. We’re going to correct the segmentation of the words and phones. The automatic segmentation process doesn’t know how to handle false starts, so it often missegments the speech near these fragments. If some of the speech overlaps with the following or preceding prompt, it may be segmented as part of that prompt. And sometimes it just does unpredictable stuff. Additionally, we want to get the boundaries around all the phones in each target word to be actually where we think there is a boundary from looking at the waveform and spectrogram. Automatic segmentation gets us close, but we want to get even closer.
- The first step is to open
merge_silences.praat, which is in the/phon/scriptsdirectory. Choose Praat > Open Praat Script…, and browse to the correct directory. - Once the script is open, highlight the textgrid in the objects window, then from the script editor, choose Run > Run (or ctrl+r).
- An info window will inform you how many extra spaces were removed, and warn you to examine the remaining spaces. We’ll get to that part in a minute.
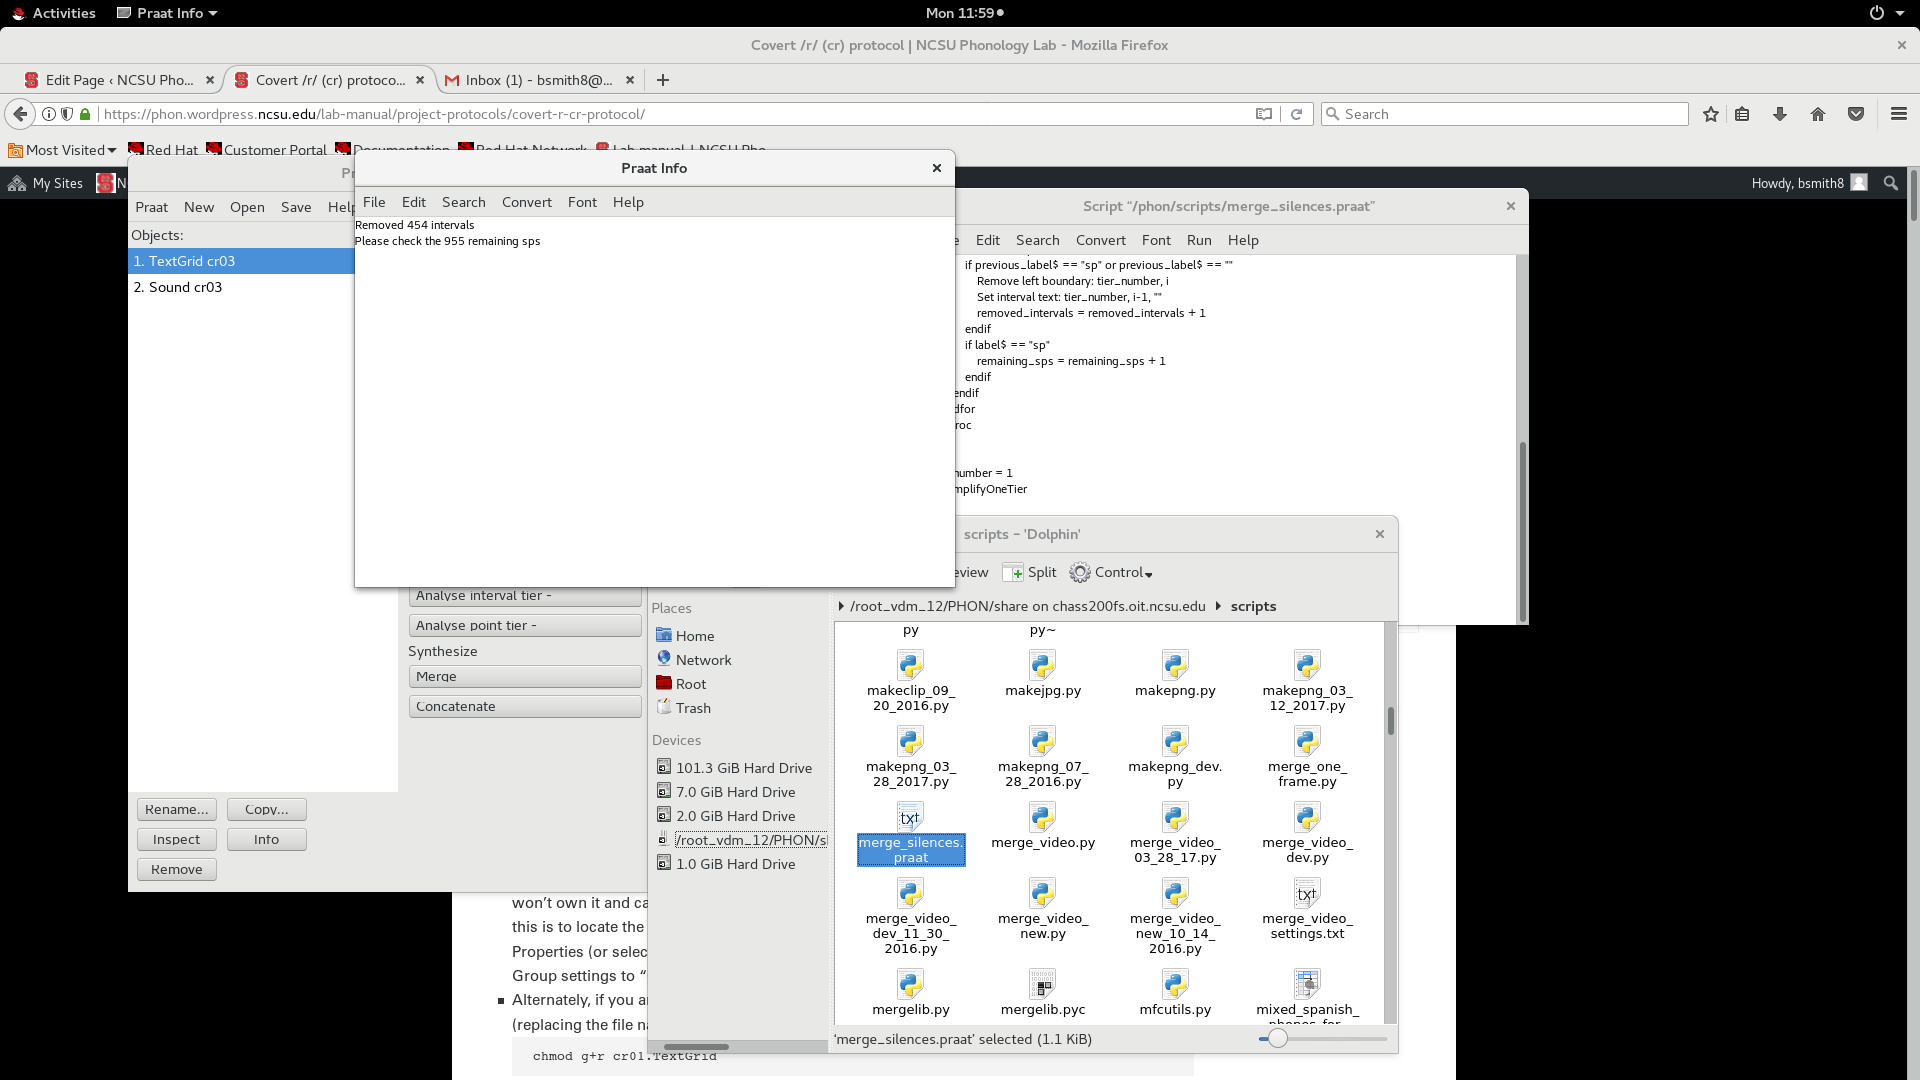
After running merge_silences.praat, you will get an info window telling you how many spaces it removed.
- Next, highlight the textgrid and sound, and choose View & Edit.
- (This step you should only have to do once). Inside of the opened TextGrid editor, choose File>Open editor script… Select
editor_align_cr.praatfrom the /phon/covart/cr directory. Then from inside the script window, choose File>Add to menu- Window should say TextGridEditor, the Menu should be somewhere intuitive to look for it, for example, under Interval, and change the Command to something you will recognize, such as “editor_align”
- After you click OK, close the script and the TextGrid editor window, then reopen (View & Edit) the TextGrid and sound. After reopening the TextGrid editor, you will now have “editor_align” as an option under your Interval menu.
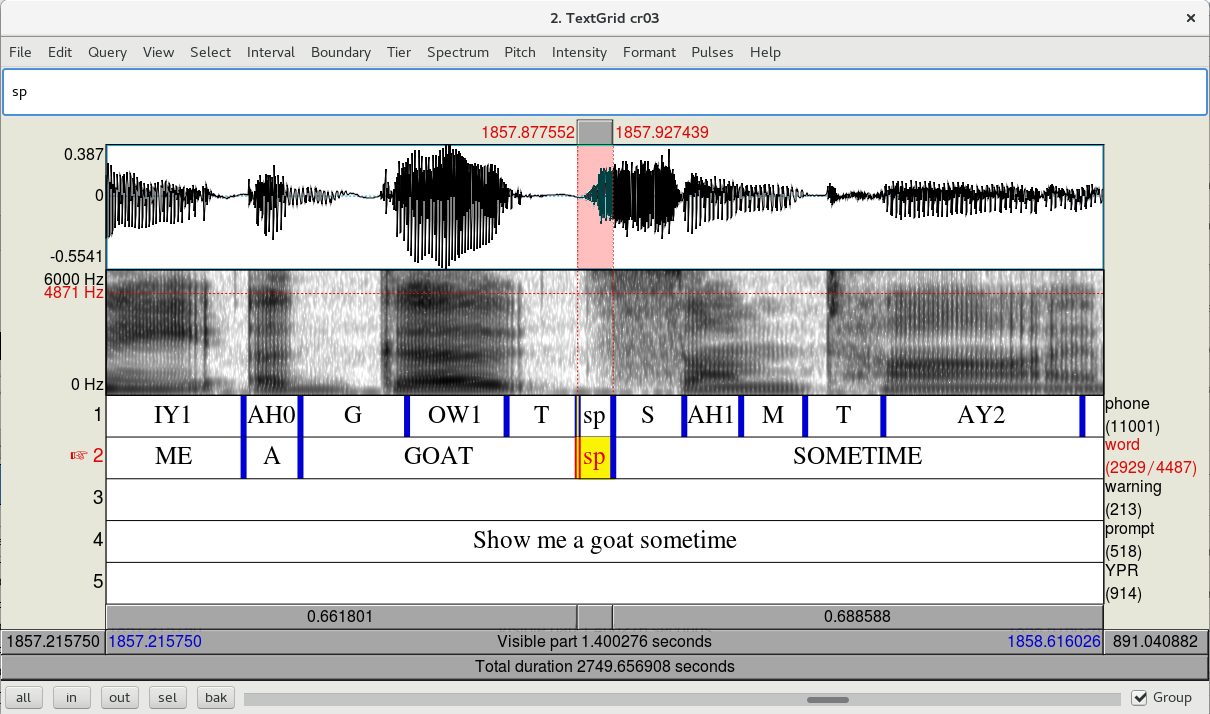
- Go through each prompt and see if the segmentation seems to line up with the speech. Because some participants did not read the prompts correctly, you need to listen to each one, and change the word and phone tier if the word they pronounced is different from the prompt. For example, the target ‘steam’ may be pronounced as ‘stream’. ‘scheme’ may be pronounced ‘scream’, and so on. If the pronunciation sounds like a purposeful pronunciation of some other word, segment it as such, and add a note in the warning tier, such as ‘scream for scheme’.
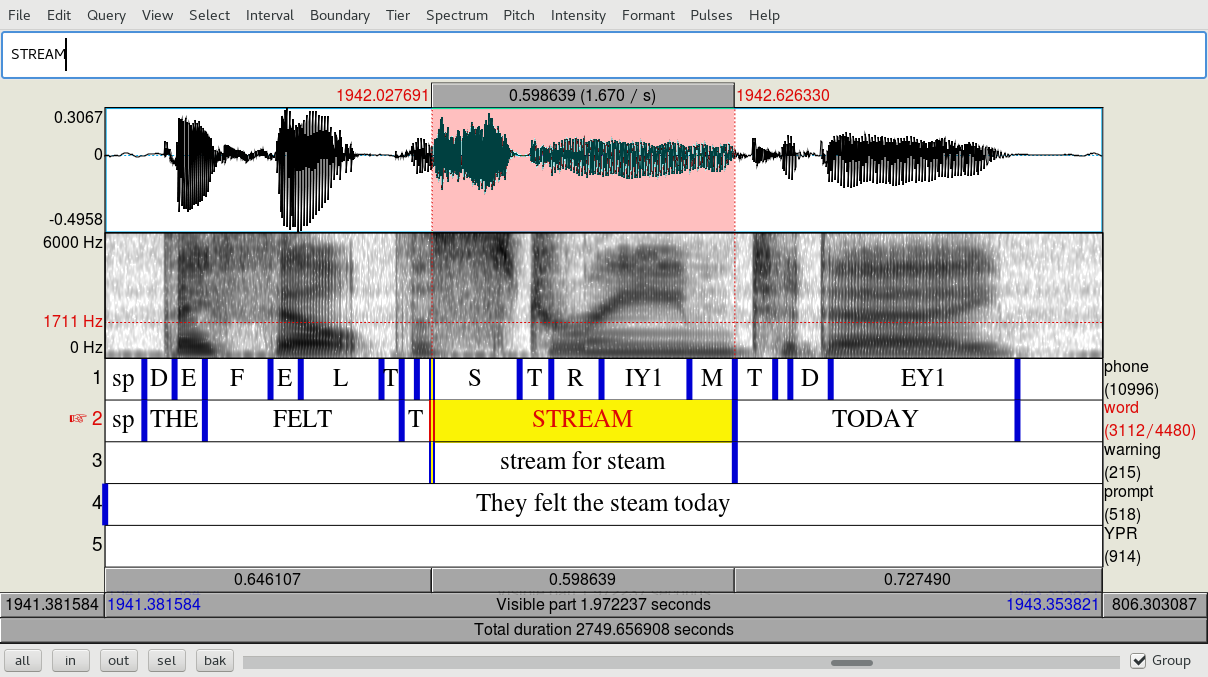
This token was originally labelled ‘steam’, and had no /r/ segmented in the phone tier. Update the correct spelling of the word in the word tier, and use editor_align to recreate the phone intervals (as detailed below).
- If it’s not a good token (e.g., they changed their mind halfway through pronouncing it, or it’s a blend of sounds), remove it from the phone and word tiers, and add a note in the warning tier (speech error).
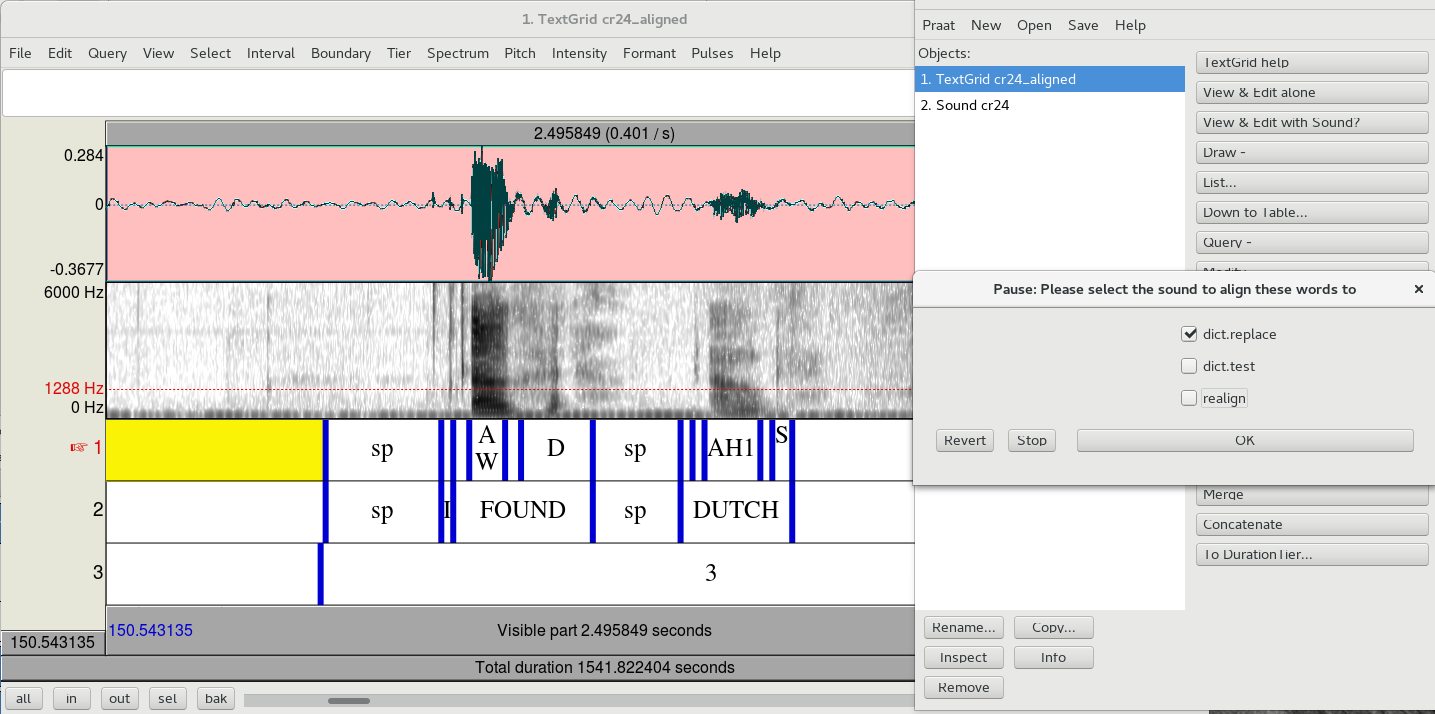
- When you see a misaligned section of phone tier, start by highlighting the interval that needs to be repaired, and making sure that tier 2 is the selected tier (the tier name will be a different color and have a finger icon if it is selected). If you don’t have the correct section on the correct tier highlighted, it will delete things you don’t want deleted. Choose editor_align from the dropdown menu, and if you have excess word intervals where you don’t want them, uncheck the “realign” checkbox. This will remove all text from tier 1 and 2, and replace it with an ‘sp’. (If it doesn’t, it’s because you’re in the wrong tier, so ctrl+Z to undo, then try again with the correct tier selected.)
- After removing excess words, you can replace any that you need to by simply typing it into an interval in tier 2, upper or lower case, entire phrases if you need to. Highlight the speech interval that you want to re-segment.
- Then choose Interval>editor_align again, and this time leave the realign checkbox ticked. This will fill in the phone tier from what you have selected in the word tier. Always keep the dict.replace box checked because this step is required to correctly label the stop phones.
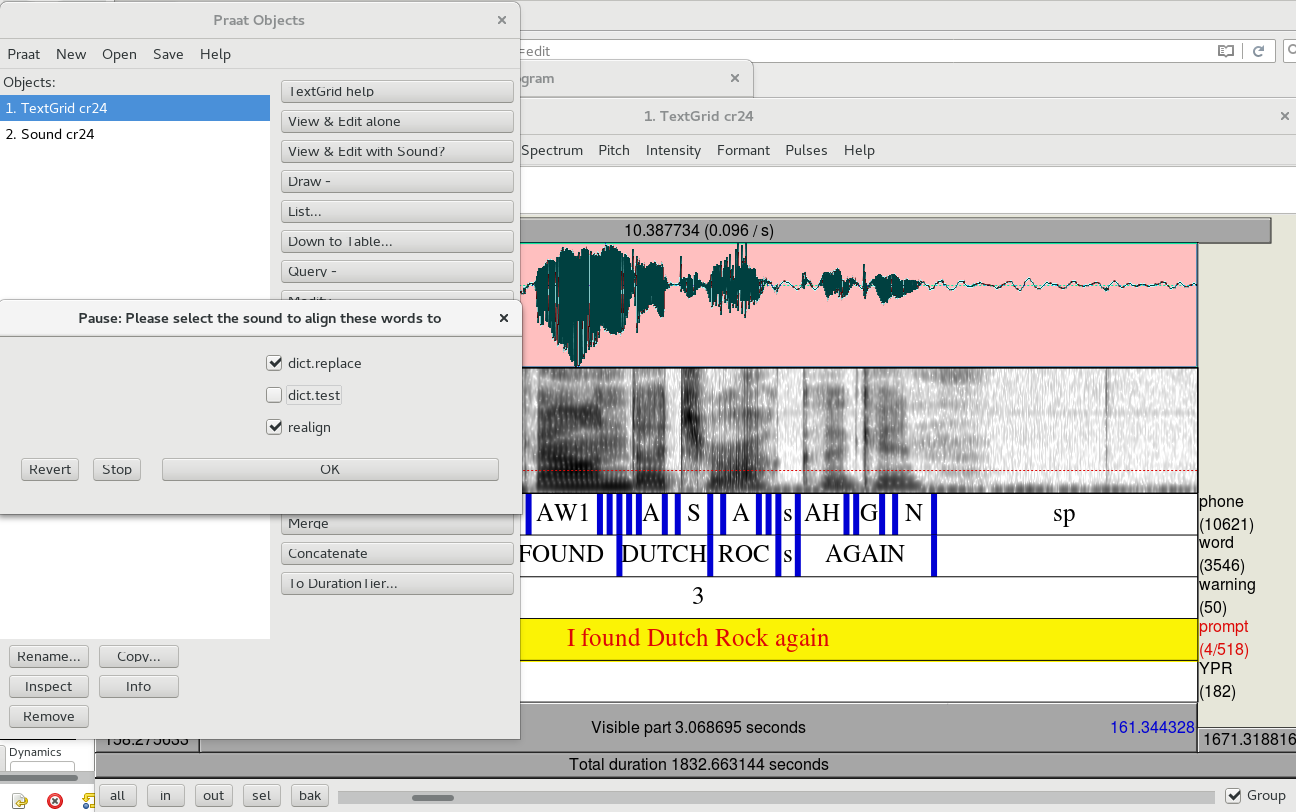
- If you are testing out new pronunciations in order to try to improve segmentation (in case a particular word or sound is consistently badly segmented), add them to dict.test, and save it. Then make sure the official pronunciation is in dict.replace. Then, when you run editor_align, check the dict.test box. (If you want to see which pronunciation the aligner chose, you can uncheck dict.replace to see the phones it used as a basis for segmentation, and then re-run it using dict.replace to correct the transcription.)
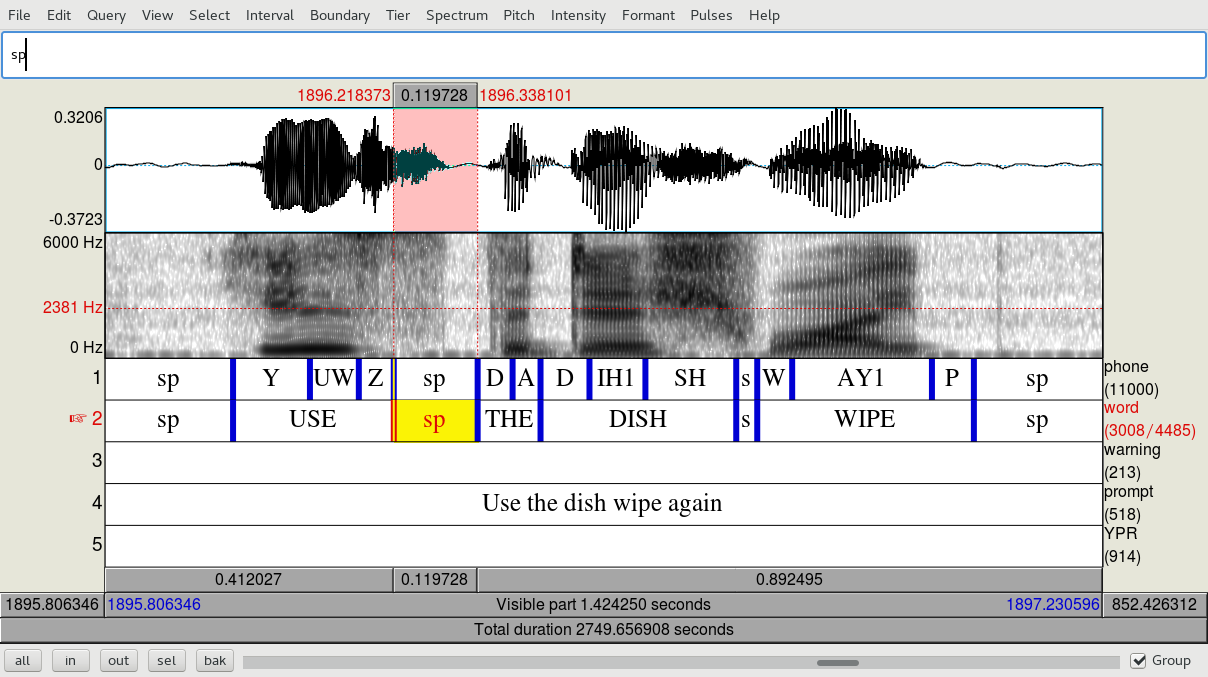
- The reason you ran the merge_silences script was so that you can do a manual search (ctrl+f, and for each successive one, ctrl+g) for all intervals marked ‘sp’, and not have all the extra ‘sp’s between prompts slow you down. Start at the beginning of the recording and look at each ‘sp’ to be sure that it actually is a short pause.
- Unfortunately, the aligner often treats the onset and offset of fricatives and affricates (and affricated stops), after {z,s,sh,jh,ch,v,f,} and before {s,sh,z,t,dh,th}, as background noise. So, you will often see part of these segments transcribed as ‘sp’.
- When you see an instance of this, select the ‘sp’ text and delete it from the word tier and the phone tier.
- Click on the boundary separating the ‘sp’ from the fricative interval and press alt+backspace to delete the boundary. Do this for the phone tier and the word tier.
Merge this ‘sp’ interval into the ‘s’ it belongs to
- If necessary, adjust the boundary. (See more on correct boundary placement at https://phon.wordpress.ncsu.edu/lab-manual/project-protocols/hand-correction-of-forced-aligned-files/.)
- Sometimes there really is a short pause, but the boundary extends into the neighboring fricative. In this case, you just need to move the ‘sp’-fricative boundary so that the ‘sp’ does not include the fricative.
- Repeat.
Adjust the boundary so that the highlighted ‘sp’ interval doesn’t include any fricative. (Then delete the following ‘sp’ that cuts off part of the SH. Sometimes you’ll get more than one sp in an utterance.)
- It may also be the case that the participant was still talking when they pressed the next button, or that they repeated the last prompt after hitting next. The autosegmentation is likely to treat all or part of this as the next prompt. Highlight the affected section and remove the text, using editor_align. If the entire utterance was mislabeled, copy the prompt from the 3rd tier, and paste it into the 2nd tier and resegment using editor_align.
- Helpful hints for correcting TextGrids:
— Pay special attention to the prompts with warnings or prompts that overlap with the last part of a trial.
— If the target doesn’t match the target prompt given, correct it to reflect the actual production.
— Make comments in warning tier if anything is really weird, for example, if prompts don’t match the utterance that the participant produced.
— Save often. Praat likes to crash when you’re almost finished, so don’t let it take 3 hours’ work with it.
Some correct segmentation guidelines (see https://phon.wordpress.ncsu.edu/lab-manual/project-protocols/hand-correction-of-forced-aligned-files/ for more detailed descriptions of other types of segmentation
-
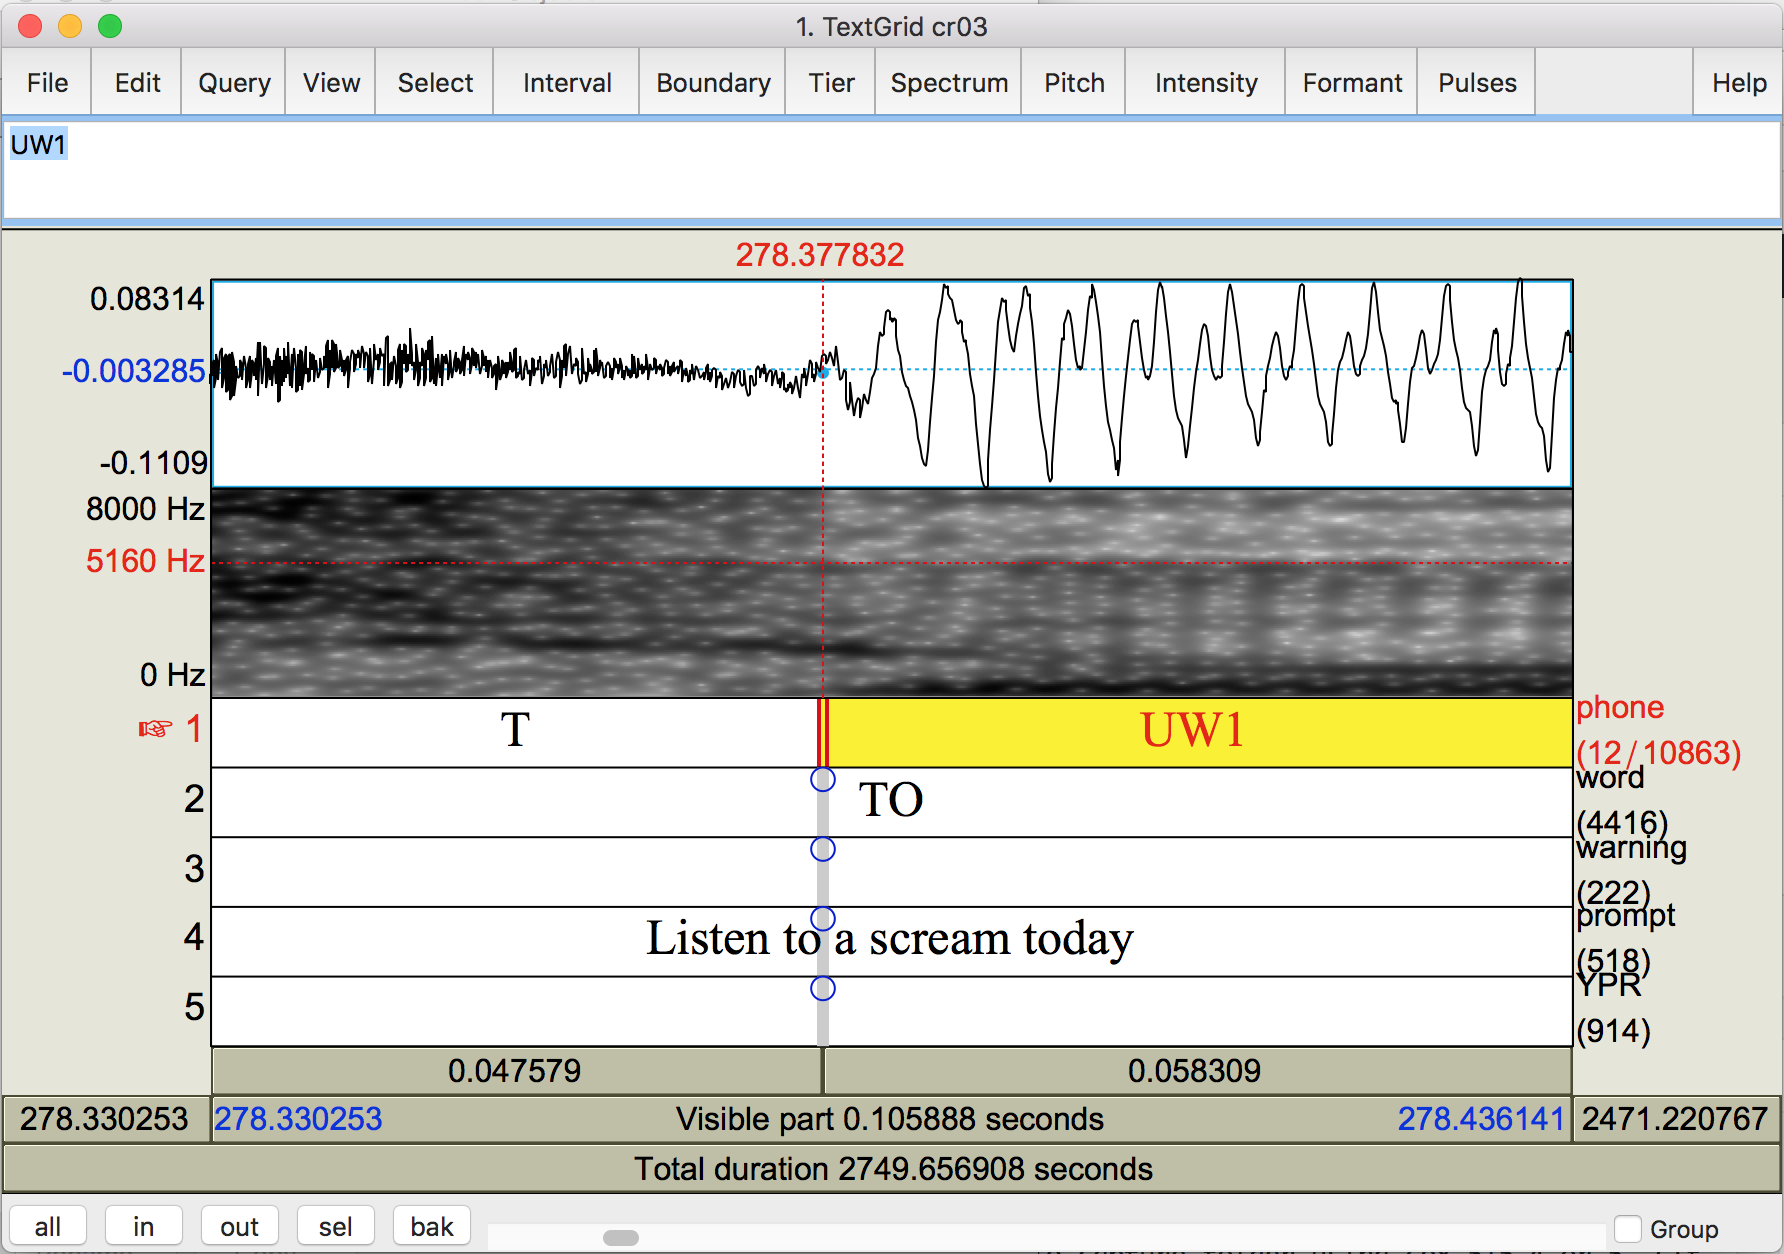
- The beginning of sibilants should start where the waveform starts to look fuzzy (i.e., turbulent)
Move the boundary for the phone (as well as the word, if applicable) to the onset of sibilance
-
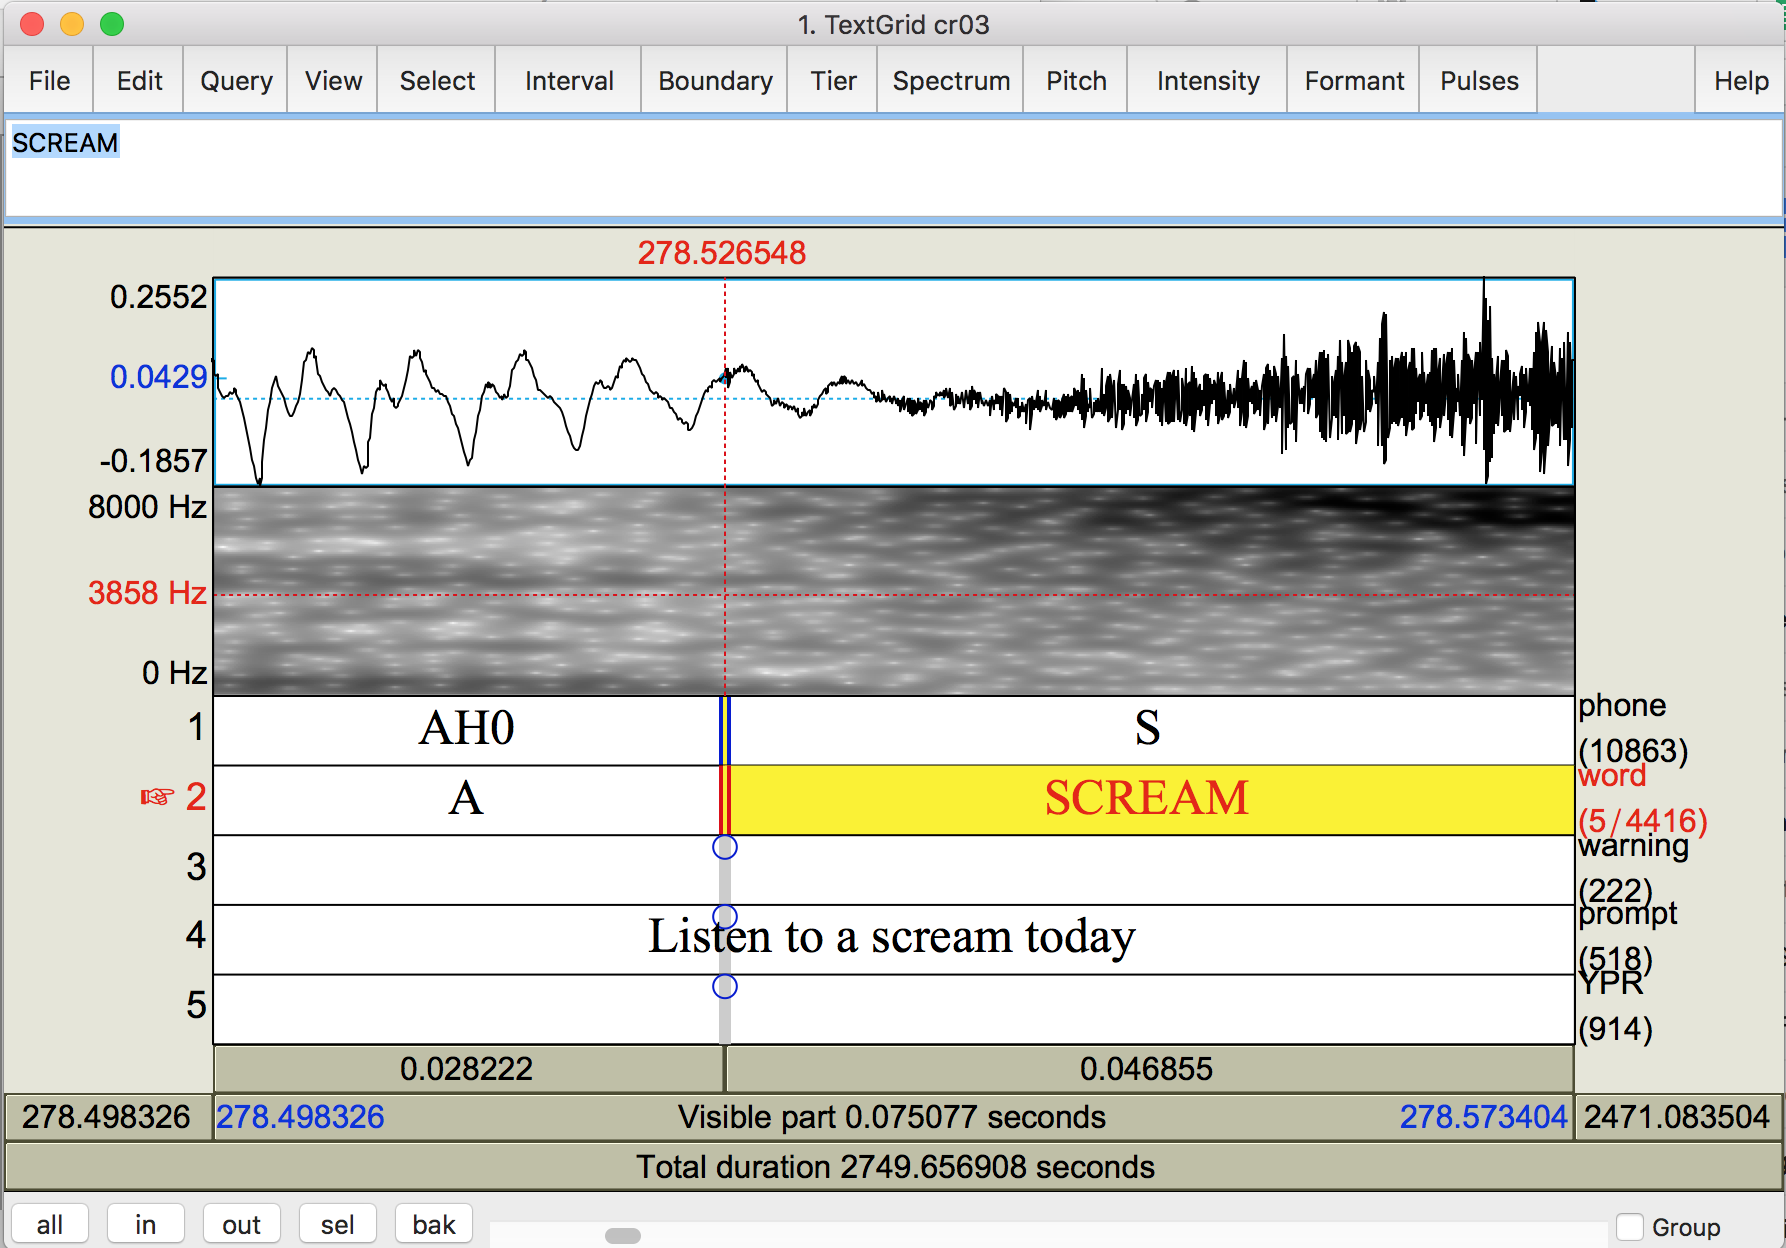
- After stops or fricatives, the following vowel or approximant should be delinated as the onset of voicing, at the first glottal pulse.
Voice onset time is when the vocal folds begin vibrating, shown by the periodic (regularly repeating) nature of the waveform
;nbsp
After the TextGrid has been corrected, start processing video and ultrasound. (We can do a lot of textgrids in a batch and then add the video after.)
-
- Copy output files from tier 3 onto Z:/phon/data_upload/ (I”M NOT SURE ABOUT THIS AND THE NEXT COUPLE STEPS BECAUSE IT SEEMS GARBLED)
- Using cox-515-1, open up the Y:\ (PHON) drive and run the archive extractor (this takes a few hours)
- Move the directory containing all the files into the directory where you will work with the data
- After the extraction is complete, check to see if the the size of the wav file in bytes divided by 1470 is similar to the number of us images, and also to the number of video images, which you can check like this if you are in the /phon/cr directory:
cd /phon/cr
ls cr01/us_capture/ | grep -c bmp
ls cr01/video_capture/ | grep -c bmp
ls -l cr01/audio_capture
- If they don’t add up, alert Jeff.
Check for audio gaps
Sometimes the audio will have missing frames. We still don’t understand exactly why, but if there is a gap, it will cause any audio and articulatory data after the time of the gap to be misaligned. Before moving on to PCA or any further steps, we need to make sure there are no gaps, or if there are, find out when they occurred so that we can add extra time to the audio and textgrid.
-
- Find the times of the last prompt in the textgrid. (If the last prompt lines up with the audio and video, you don’t have any gaps)
- Make a video clip of your ultrasound or video data, using a command like this (replacing the wav file name, and start and end times from the textgrid you’re working on):
python /phon/scripts/makeclip.py --wavpath audio_capture/cr01.wav --start 1462.533 --end 1464.641 --output test_video_cr01
-
- If the video lines up with the audio, procede to the palate and occlusal planes.
- If not, make a series of videos, narrowing in on the gap.
- For example, if the end did not line up, next try around the midpoint. If that doesn’t line up, begin dividing the first half into halves. If it does line up in the middle, begin dividing the last half into halves.
- Once you have located the gap, insert 370-400 ms into the wavfile and textgrid, using the following:
(Fill this in after I find it)
Next check the palate and occlusaal plane intervals.
- Use the start and end times from the “palate” and “occlusal” intervals in the TextGrid phone tier to get those images.
- Confirm that the palate and occlusal plane intervals are correctly aligned by using
makeclip.pyfor both, and checking out the movie files:python /phon/scripts/makeclip.py --wavpath audio_capture/cr01.wav --start 9.9953 --end 14.1138 --output cr01_palate python /phon/scripts/makeclip.py --wavpath audio_capture/cr01.wav --start 41.4402 --end 44.375 --output cr01_occlusal
- If you can’t find a good palate or occlusal plane, try expanding the search area, usually by moving earlier in time, since there might be a point that we saw it but didn’t beep (there may have been some fumbling going on, and we just needed to advance to the next step). Adjust the textgrid accordingly, and repeat until an image is found.
- Convert the bitmaps to pngs.
- The time stamps on each of the files are not all the same number of digits. To fix this, run
add_zeros.pyso that the naming conventions are all the same:python /phon/scripts/add_zeros.py us_capture/ python /phon/scripts/add_zeros.py video_capture/
- Use
bmpsmpl.pyto sample the video bmpspython /phon/scripts/bmpsmpl.py --output cr01_video
- Open the resulting file, cr01_video_summary.bmp, to help you choose a rectangular mask that includes all of the possible lip area, but cuts down on extra non-lip area.
- Each textured block in the summary output is 80×80 pixels, so add 80 pixels for each block, or 40 pixels for each half-block, etc. The four numbers you need to come up with are:
1) w= the width and 2) h= height of the box that will enclose the lips, and 3) the x- and 4) the y- coordinates for the top-left corner of the box, like this:
python /phon/scripts/makepng.py --textgrid cr01.TextGrid --crop 360x280+160+80
Which will yield a box that is w=360 x h=280 pixels in size, starting at the coordinates x=160 and y=80.
makepng.pywill create two scripts that do the actual conversion: a test script, calledcr01_test(to see if you like your lip image cropping) and a convert scriptcr01_convert(to convert all the images for the palate and occlusal plane movies and the ultrasound and video, I think, maybe?).- Then you can check to see if you’ve cropped too much or too little by running:
./cr01_test
and then look at images in /video_png to make sure they are the right dimensions and not cutting off any lip space. Re-run
makepng.pywith different dimensions, if necessary (you will have to delete the old files before you re-runmakepng.pybecause it will not overwrite existing files), and when you’re satisfied, run the following to convert all the rest of the files to pngs (using nohup so you can shut down your session while it runs):nohup ./cr01_convert &
- To check whether the convert script is done (wait a few hours at least – imagine it’s like a 5 hour road trip, and you don’t want to start asking “Are we there yet?” until you’re at least halfway there), use the following command to find out: “how many images am I trying to convert?”:
grep -c png cr01_convert
And then: “how many images have I created in the four directories that might hold images?”:
ls palate/ | grep -c png
ls occlusal/ | grep -c png
ls us_png/ | grep -c png
ls video_png/ | grep -c png
Keep pasting these commands until the numbers add up to the number you got above. There should be a similar large number of us and video files, and a small number (a few hundred at most) of palate and occlusal files. When the numbers add up, it means all the images that were supposed to be created have been created. If you don’t have intervals in your textgrid’s phone tier labeled “palate” or “occlusal”, these directories will remain empty, so double-check the TextGrid and add them if this is the case. Run the script again if you have to, and don’t worry about re-writing the us and video files because the script won’t overwrite them. I think.
Also, it’s helpful to make a note in the spreadsheet of which computer you are using to do these time- and memory-intensive processes, so you don’t run multiples on the same machine and slow it down, and so others can avoid those computers while they’re running.
Create lists of relevant intervals to process
- Create folders to hold PCA output for us and video inside of the participant’s main directory:
mkdir us_pca
mkdir video_pca
- Use
list_files_for_pca.pyto make filelists for ultrasound and video, which will be a list of which intervals to use and which to ignore. For the ultrasound, you don’t need to specify the--imagePathand--pca_pathbecause the default is to use the us_png and us_pca. You do need to add these arguments for the video.python /phon/scripts/list_files_for_pca.py --textgrid cr01.TextGrid --basename cr01 python /phon/scripts/list_files_for_pca.py --textgrid cr01.TextGrid --basename cr01 --imagepath video_png --pcapath video_pca
Then start preparing the ultrasound images
- Type this to enable MATLAB for this session:
add matlab81
- The MATLAB functions will filter all of your images to enhance the tongue contour. The first step is to try two different filter settings and choose the best one. Enter this command, replacing all the instances of ‘cr01’ to make the sample filtered images.
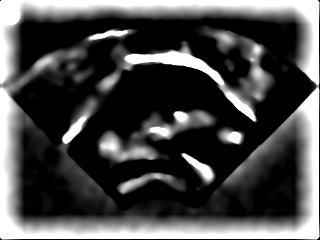
matlab -nodisplay -nosplash -nodesktop -r "P=path;path(P,'/phon/PCA');us_filter_check('cr01','png','/phon2/covart/cr/cr01/us_png/','/phon2/covart/cr/cr01/us_pca/');exit" - This will produce mydata_LoG_1.jpg and mydata_LoG_2.jpg in /phon/cr/cr01/us_pca/ Download them and look at them, and decide which does the best job of enhancing the tongue surface without enhancing too much else. For example, see the sample filtered images below where the second (right-hand or lower) image is preferable because there’s not too much extra bright stuff that is not the tongue surface.

- Next, make a composite image from a sample of all your images. If you liked mydata_LoG_2.jpg the most, enter the following command with the 2 after ‘bmp’. If you liked mydata_LoG_1.jpg the most, put a 1 there instead.
matlab -nodisplay -nosplash -nodesktop -r "P=path;path(P,'/phon/PCA');us_selection_low('cr01','png',2,'/phon2/covart/cr/cr01/us_png/','/phon2/covart/cr/cr01/us_pca/');exit" - Running the
us_selection_lowfunction will produce a file called cr01_selection.jpg that is an average of a sample of your images, so that you can determine the range of tongue movements, and define a region of interest to restrict your analysis (so you don’t waste time calculating the values of pixels where the tongue never goes). To define the region of interest, first copy the selection file to the /phon/upload/ folder, renaming it test_selection.jpg:cp /phon2/covart/cr/cr01/us_pca/cr01_selection.jpg /phon/upload/test_selection.jpg
- Choose the palate image by browsing to /phon/cr/cr01/palate and looking at the images, then copy it to the /phon/upload/ folder, renaming it test_palate.png.
cp /phon2/covart/cr/cr01/palate/cr01_0010257_0587.png /phon/upload/test_palate.png
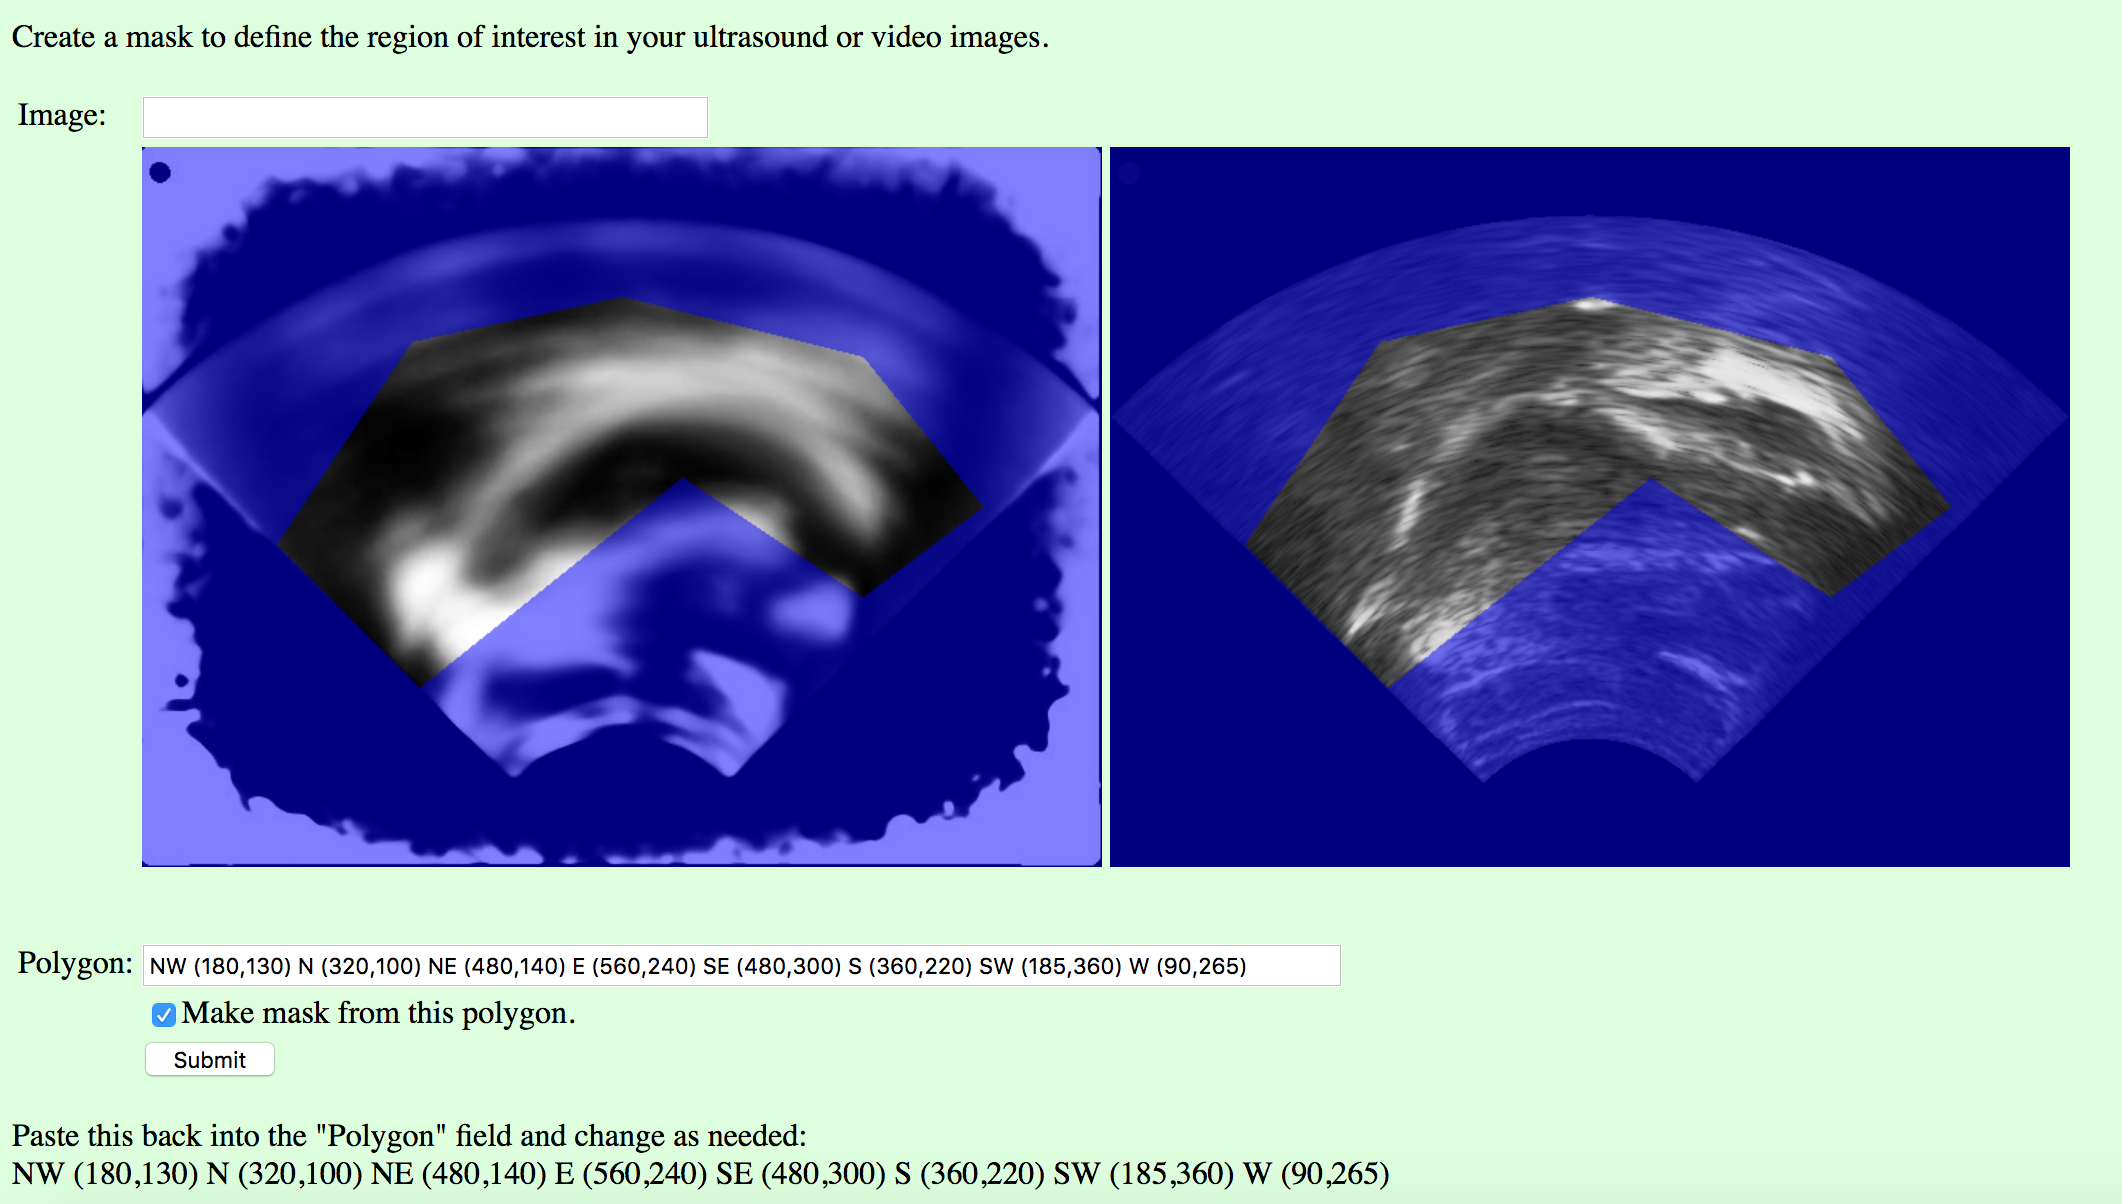
- Then go to the image mask page [http://phon.chass.ncsu.edu/cgi-bin/imagemask2.cgi] in a web browser. Enter “test_selection.jpg” in the “Image” field, and click Submit. You may need to refresh the page before the correct image appears. The two images will appear with a blue overlay (the mask), with the average tongue range on the left, and the palate frame on the right. The points that are written at the very bottom of the page (scroll down, if you have to), define the polygonal window in the mask (the region of interest) in a vector of (x,y) pixel coordinates. Copy the numbers into the “Polygon” field, make a change, and click “Submit” to see the result. You will have to keep pasting them back into the field to change them. The letters “NW”, etc. are just there to help orient you using compas points for up, down, left, and right, and you can use more or fewer points than the default of eight.
- When you have adjusted the points so that you can see the tongue through the window and the blue mask only covers the places the tongue doesn’t go, re-paste the coordinates and click the “Make mask from this polygon” checkbox and click submit one more time. (This would be a good time to paste the coordinates into the participants file, so you don’t have to look them up later.) Now there should be a test_selection_mask.csv file in the /phon/upload directory. This file will tell the next script which pixels to keep in each image. Copy it to your folder:
cp /phon/upload/test_selection_mask.csv /phon2/covart/cr/cr01/us_pca/cr01_mask.csv
- For the lip video mask, MATLAB just needs to know the size and shape of the video clips that you chose earlier. So, rename the dummy mask file (which is just a list of the rectangular coordinates that got produced in the /us_pca folder when you ran the list selection script) to participantID_mask.csv:
mv /phon2/covart/cr/cr01/video_pca/dummy_mask.csv /phon2/covart/cr/cr01/video_pca/cr01_mask.csv
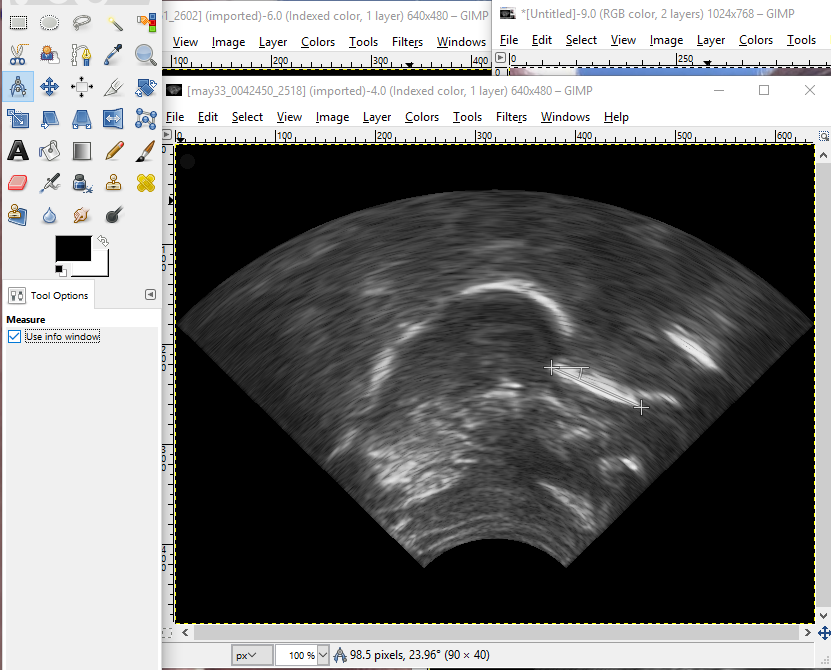
- One more thing you need to do before the PCA is to go back to the occlusal plane images in /phon/cr/cr01/occlusal and select one where there is a clear flat spot of the tongue against the tongue depressor. Open the file in GIMP, and use the measurement tool, as shown in the screen capture, to measure the angle of counter-clockwise rotation. Select the measure tool from the main toolbox or from the drop-down tools meanu. Make sure that “Use info window” is selected in the lower left area. Hold down the shift button while you click and drag the cursor across the flat edge of the tongue, and the number of pixels and angle (difference from 180 degrees) will be shown in the lower margin of the window. Here it shows 23.96, which we’ll round to 24 degrees.
Now we’re ready to do the Principal Components Analysis!
- There is a MATLAB pca function each for ultrasound and lip video. Both pca functions require a downsampling rate (both 0.2 below). This number determines how much the image resolution will be reduced. For this argument, use a value between 0 (no resolution) and 1 (full resolution). They also take an argument for the maximum number of principle components to calculate (both 50 below). If an integer value is used, the PCA function will retain that many PCs in the output. If, however, a non-integer value between 0 and 1 is used, the PCA function will interpret this number as a percentage threshold. In this case, the PCA function will retain as many PCs as are required to explain the given percentage of variance. For example, if you put 0.8 as a value for this argument, the output will retain as many PCs as are needed to explain at least 80% of the total variance in the image set.
- The ultrasound requires more information — 1) the counter-clockwise angle of occlusal plane rotation (24, in the example below, taken from the measurement in GIMP just above); use this argument to rotate images to the speaker’s occlusal plane. And filter (that was the contrast level (LoG) you chose earlier) as the third number after ‘png’.
- We can process about 10 frames per second (but we record at 60 frames per second), so processing takes about six times real time. That’s why we run MATLAB using the command “nohup” (no hangup), so that the process will keep running even if you lose your connection to the server. These two commands create a script with all the arguments and files that you need to be able to call up using
nohupso they can runvideo_pca.mandus_pca.min the background:echo "P=path;path(P,'/phon/PCA');video_pca('cr01','png',0.2,50,'/phon2/covart/cr/cr01/video_png/','/phon2/covart/cr/cr01/video_pca/');exit" > /phon2/covart/cr/cr01/video_pca/pca_cmd echo "P=path;path(P,'/phon/PCA');us_pca('cr01','png',2,0.2,24,50,'/phon2/covart/cr01/us_png/','/phon2/covart/cr/cr01/us_pca/');exit" > /phon2/covart/cr/cr01/us_pca/pca_cmd - Then you can execute them using
nohup. The following lines just execute the scripts you created in the above steps. Log onto a different computer/open different terminal windows to run each of them to expedite the process (keep track of which machine each is running on so you can track errors).video_pcatakes about a half hour, whileus_pcashould take somewhere under 5 hours:nohup matlab -nodisplay -nosplash -nodesktop < /phon2/covart/cr/cr01/video_pca/pca_cmd & nohup matlab -nodisplay -nosplash -nodesktop < /phon2/covart/cr/cr01/us_pca/pca_cmd &
Merge video (you can do this at any time after the png files are created, but now is a good time)
- You can do this before or while the pca is running, since it’s not dependent on it. First, copy the merge_video_settings.txt file from may29 (or cr01) to the new participant’s folder:
cd /phon/cr/cr01
sed 's/may29/cr01/' </phon/cr/cr01/merge_video_settings.txt >/phon/cr/cr01/merge_video_settings.txt
- Then merge the video:
nohup python /phon/scripts/merge_video_dev.py &
- After completion, find out how many files are in the us_with_video folder, and put that number in the “list” column in the participant spreadsheet:
ls us_with_video | grep -c jpg
Clean-up: make sure all the files are executable by the rest of the group
- If you are the owner of the directory, this is easiest for you to fix!
Make the directory executable (=usable as directories)
chmod g+x /phon/cr/cr01
Make the subdirectories (and files) executable too (because there isn’t a good way to single out just the directories)
chmod g+x /phon/cr/cr01/*
Make the files with extensions non-executable (subdirectories and cr01_test and cr01_convert remain executable)
chmod g-x /phon/cr/cr01/*.*
Make the directory and all its contents readable (Recursively)
nohup chmod -R g+r /phon/cr/cr01 &
(There will also be instances where we want directories and files to be writable by the group, but it's safest not to do that by default).
Make RData files for that participant
- Once everything is finished processing, and all the files are there and sorted out, open an R session in your terminal window, and collect the PCA data to attach to the RData file for that participant:
R

setwd('/phon/cr/RData')

library(bmp)
library(tidyr) # requires stringi
library(tuneR)
library(textgridR) # library(devtools); install_github("jpellman/textgridR")
library(MASS)
source('/phon/scripts/image_pca_functions.r')
subjects <- c('cr01')
for (subject in subjects){
   all_pca <- gather_pca(subject, perform_pca=TRUE)
   save(all_pca, file=paste0(subject,'.RData'))
   all_pca[[subject]]$us_info$vecs_variable <- NULL
   all_pca[[subject]]$video_info$vecs_variable <- NULL
   save(all_pca, file=paste0(subject,'_no_vecs.RData'))
}
That’s it! It only took a few days, but you’ll get faster next time 🙂
List of scripts required for cr protocol:
/phon/scripts/merge_video_dev.py

/phon/PCA/video_pca.m

/phon/PCA/us_pca.m

/phon/PCA/us_selection_low.m

/phon/PCA/us_filter_check.m

/phon/scripts/list_files_for_pca.py

/phon/scripts/bmpsmpl.py

/phon/scripts/makepng.py

/phon/scripts/makeclip.py

/phon/scripts/editor_align.praat

/phon/scripts/parselog.py

/phon/pf2a/align_lab.py

/phon/scripts/add_zeros.py

/phon/scripts/image_pca_functions.r