

In this example we’ll practice using audio stimuli and recording as well as utilizing the useful getDuration() function. Often in a shadowing task the goal is to determine which features or language varieties are most salient by asking people to mimic or repeat what they hear. In this example, we’ll be doing just that.
First, create a slide for instructions using the skills you’ve learned in the previous examples. Then, create a new routine called “shadowing” where we’ll be doing the bulk of the work. It helps to first think about how you want the stimuli presented chronologically and then build. Here’s the order we’ll be using
- A short blank screen of 0.5s for transitions
- A sound of some duration will play
- When the sound ends, a message saying “Please Repeat” will appear
- Also, the microphone will turn on at this point
- 1 second after the text/mic start, the space bar will start so that participants can move to the next trial.
You can easily create a blank screen by adding an Image component and changing the size to [2,2].
Next, click on the Sound component and change the following information:
- Start time – 0.5
- Stop duration (s) – (leave blank)
- Sound – $audioStim
- Sound – set every repeat
Then, create a conditions file like in the previous example. This time, we’ll just have one variable “audioStim”. Each row should contain the file path (absolute or relative) to an individual wav file. Add a loop around shadowing using the conditions file. Make sure to change nReps to 1 (or however many reps you’d like).
Now comes the difficult part, getting components to start directly after the sound file finishes playing. If all of our sound files are the exact or similar duration, we could just use an estimate for defining start and end times. However, a better way is to use the duration of each sound file dynamically.
To demonstrate the usefulness of this, create the text component, leaving the Stop (duration) blank and adding the text “Please Repeat” to the text box. Then we’ll put the expression $sound_1.getDuration() + 0.5 in the Start time (s) field. Notice that we’re using the name of the component, not the variable $audioStim. Your sound component might be named something different (sound_2, etc).
Do the same thing for the microphone component, leaving Stop duration blank and defining the start time as $sound_1.getDuration() + 0.5.
Then, add a key response to end the routine, making sure that stop duration is blank, “Force end of routine” is checked, and the start time is defined as $sound_1.getDuration() + 1.5. Your builder window should look like the figure below:
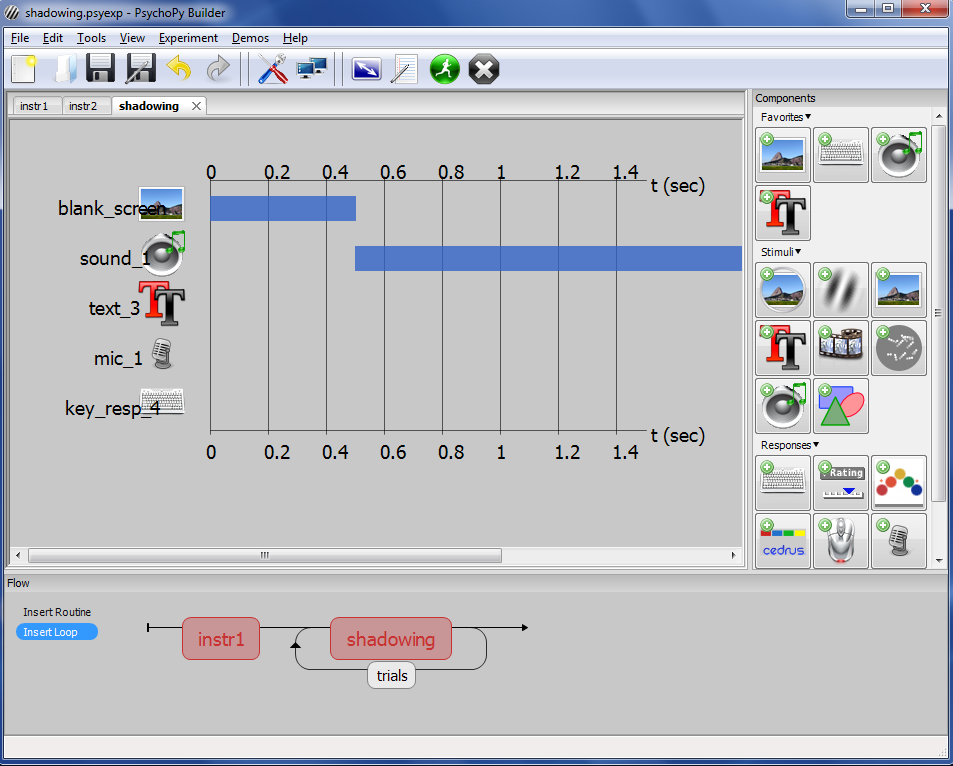
Figure 6 – Shadowing Experiment Example
You’ll notice that the duration/time bars for the text, mic, and key responses are not shown. This is because their start times are being defined by the variable $sound1.getDuration(). If you’d like to add estimate bars for visual completeness, you can add expected values in the Expected Start (s) and Expected Duration (s) field of each component.
Once you’ve run through the experiment, all the wav files you’ve recorded will be stored in a folder inside the data folder.
In the next example we’ll be examining how to hack conditional branching in order to give feedback on a participant’s responses.
Back to (2. PsychoPy Tutorial: Loops and Trials – Lexical Decision Task)